Basically, File Explorer, more commonly known as Windows Explorer, functions to provide users with unrestricted access to the file system. It ranges from displaying, modifying, to organizing folders or files within the device.
Looking at its advantages, Windows Explorer often plays an active role when operating a computer/laptop.
However, in certain situations, Windows Explorer sometimes encounters error issues, one of which is "Windows Explorer has stopped working".
Actually, this issue is quite similar to the error that occurs when Windows Explorer becomes unresponsive. The difference is that when you experience Windows Explorer has Stopped working, it can impact system performance.
For instance, issues like a blank Windows, unresponsive mouse, and even frozen screens can occur. To address this problem, let's explore the causes and solutions to overcome Windows Explorer has stopped working.
See Also: 11 Ways to Solve Windows Update Error in Windows 10.
The Causes of "Windows Explorer Has Stopped Working"
When Windows Explorer frequently displays the error message "Has Stopped Working," it is usually caused by the storage on your Device's C Drive being overly full.
However, some Windows 10 users also believe that this issue could potentially be caused by problematic drivers, conflicts between system services, or even virus infections. To delve into more detailed information, you can consider the following potential causes.
- Problematic driver display - It is possible that the error in Windows Explorer is caused by a damaged or outdated display driver. Therefore, you need to ensure the condition of the driver by accessing the Device Manager.
- System issues - When your system encounters issues, it can be assumed that several programs within it are also affected. Considering the role of the system greatly influences program or application performance.
- Full hard disk storage - As a computer/laptop user, you must have known that when the device storage is full, it can lead to various problems afterwards. One of them is that the device performance becomes suboptimal, leading to Windows Explorer displaying the message "has Stopped working."
- Conflicts with certain programs or services with Windows Explorer - This problem can also be caused by conflicts between programs and system services. Usually, this happens when you engage in excessive multitasking without considering device resources.
- Excessive junk/cache files in the system - Additionally, the accumulation of cache/junk files in the system can also cause issues with Windows Explorer. While fundamentally not very harmful, the abundance of these files can fill up your storage space.
- Affected by viruses or malware - Viruses or malware often become reasons why the Windows system can't function optimally. This might be because the virus has altered or deleted files within the device.
See Also: 12 Ways to Speed Up Windows Booting
How to Overcome "Windows Explorer has stopped working"
There are several solutions you can implement to address the issue of Windows Explorer encountering the "has stopped working" error. These methods we outline can be applied to Windows operating systems 11, 10, 8, and 7.
1. Check the storage capacity of the hard disk
Before you proceed with resolving the ongoing issue, there are a few things you need to ensure first. One of them is to check the storage capacity of your hard disk, particularly on Drive C.
When your hard disk storage is full, it's not uncommon for Windows Explorer to frequently display the "has stopped working" message.
To fix this issue, you simply need to free up storage space. This can be achieved by deleting files or uninstalling applications.
Additionally, there are several steps you can take to enhance your device's performance. For example, you can increase storage capacity, switch from an HDD to an SSD storage, or upgrade your RAM capacity.
2. Try restarting Windows Explorer.
When Windows Explorer is experiencing issues, whether it's not responding or has stopped working, the step you should take is to restart Windows Explorer.
This method is considered highly effective in resolving various problems or disruptions that may arise with Windows Explorer. To perform the restart, it can be done in two different ways. Let's explore both methods below.
Using Task Manager:
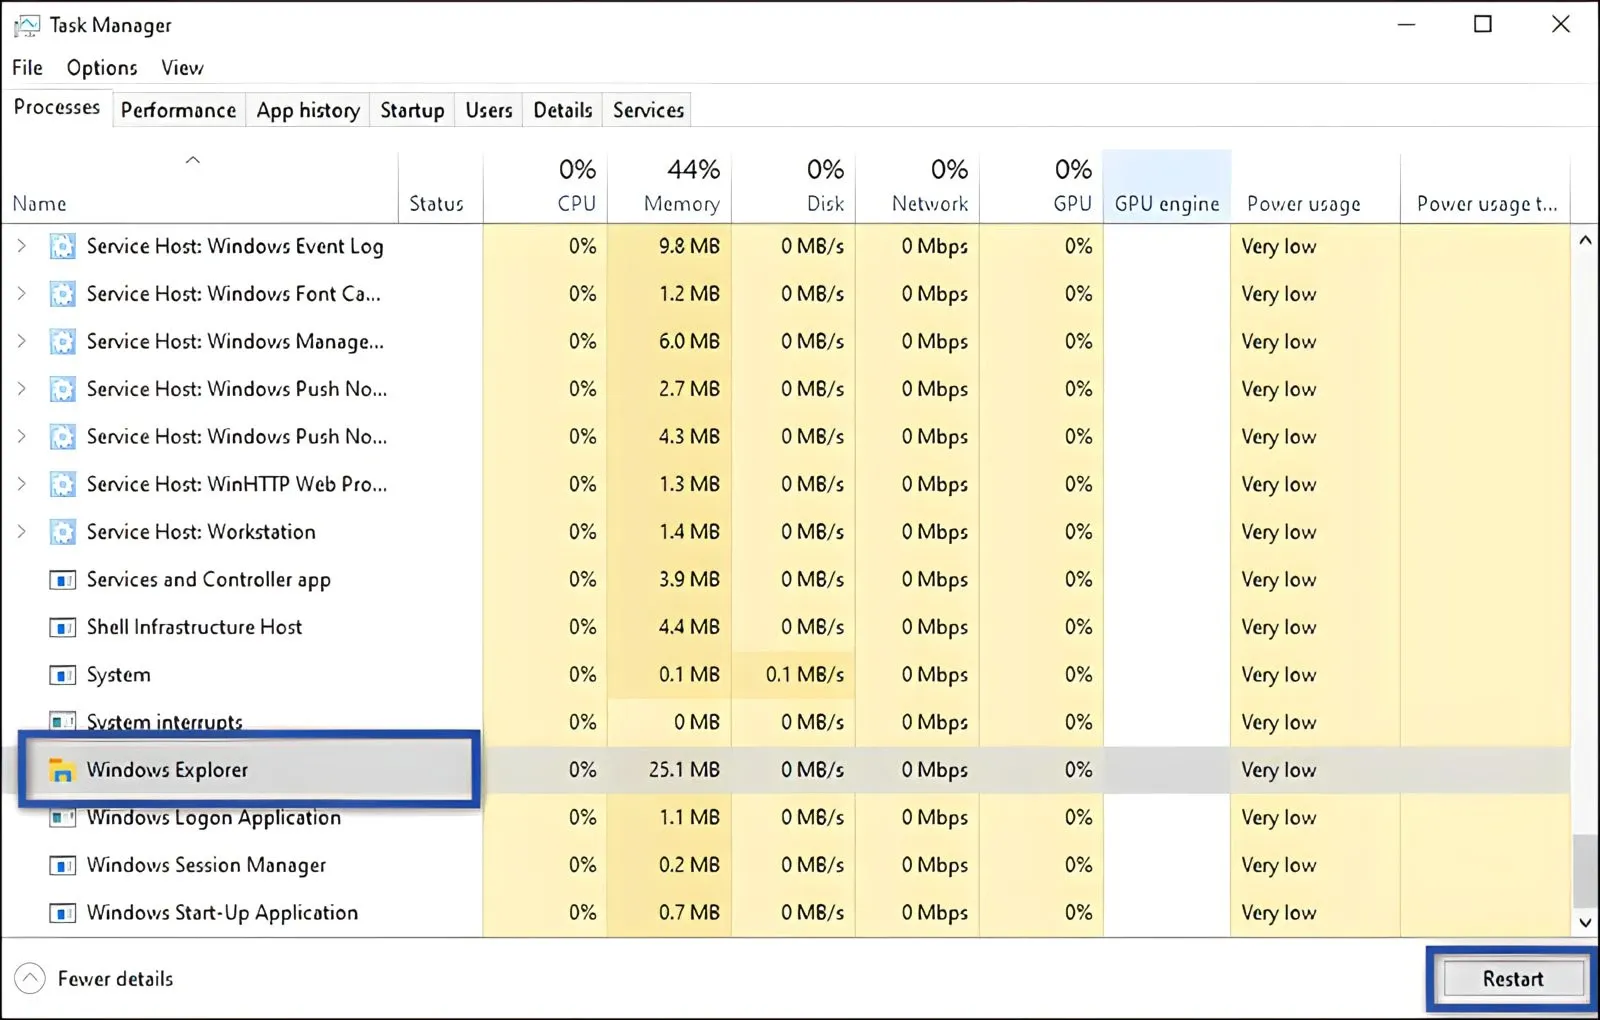
- Right-click the Windows 10 Taskbar and select Task Manager.
- In the "Processes" tab, locate and click on Windows Explorer, then click Restart.
- Wait for a moment as the system refreshes.
- Afterward, try opening Windows Explorer again.
- Done.
Note: When you click Restart for Windows Explorer, your desktop screen may briefly freeze or go blank. This happens because the Explorer process has been temporarily halted. However, it will return to normal shortly. If the above method doesn't fix the issue, please try the method below.
Temporarily stopping the Windows Explorer process:

taskkill /f /im explorer.exe

start explorer.exe- Click the Start menu in Windows.
- Scroll down to find Windows System.
- Once found, right-click Command Prompt » More » Run as administrator.
- Next, type the command: taskkill /f /im explorer.exe » press Enter.
- Then, proceed by typing the command: start explorer.exe » press Enter.
- Afterward, check the state of Windows Explorer.
- Done.
See Also: 9 Ways to Resolve File Explorer Errors, Inability to Open Files
3. Update the device's display adapter driver
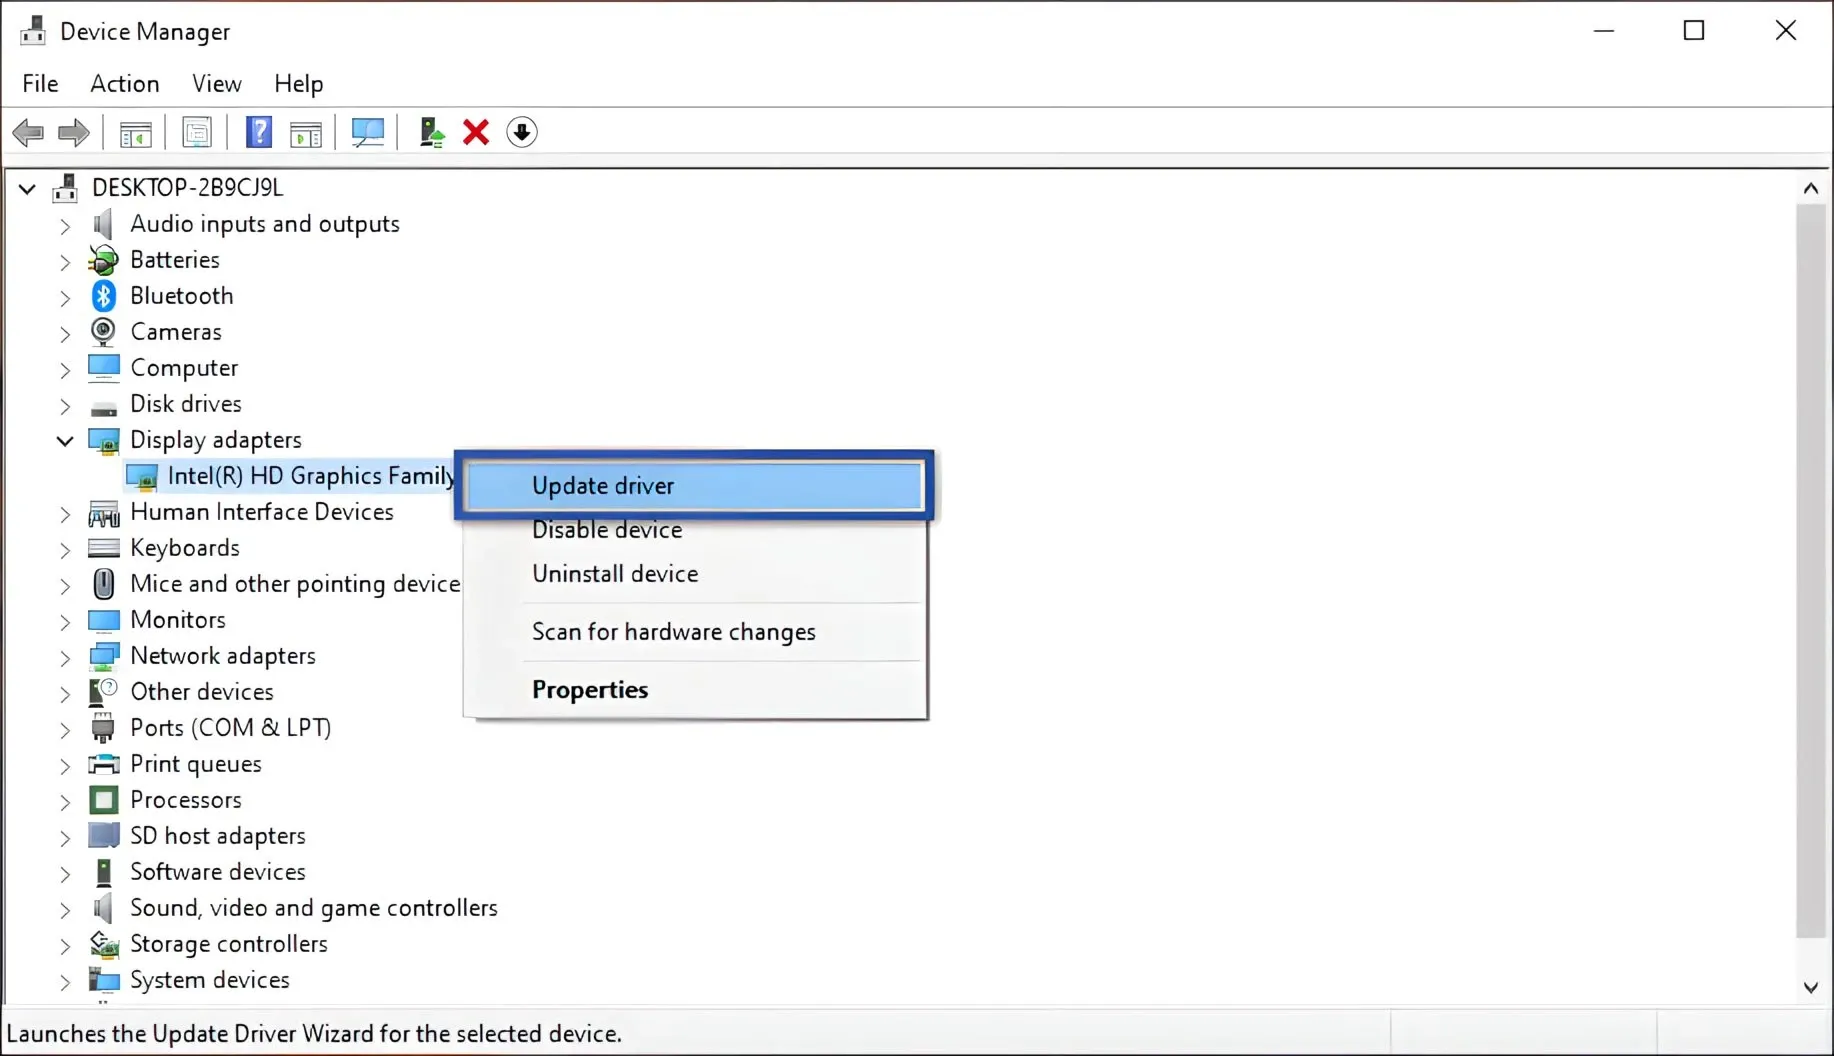
Next is to update the device's display adapter driver. As I informed earlier, the cause of this problematic Windows Explorer could possibly stem from a faulty display driver.
It's possible that the driver has become corrupted or outdated, requiring an update. If you're unsure about how to update the driver, please follow these steps.
- First, right-click on the Windows Start menu » select Device Manager.
- Then click on Display Adapter section » then right-click on the display driver that needs updating.
- Once done, select Search automatically for drivers.
- Subsequently, the laptop will initiate a search and installation process for the driver » once finished, please click Close.
- Afterwards, try restarting your laptop and observe the changes.
- Done.
4. Run the SFC & DISM commands with Windows PowerShell
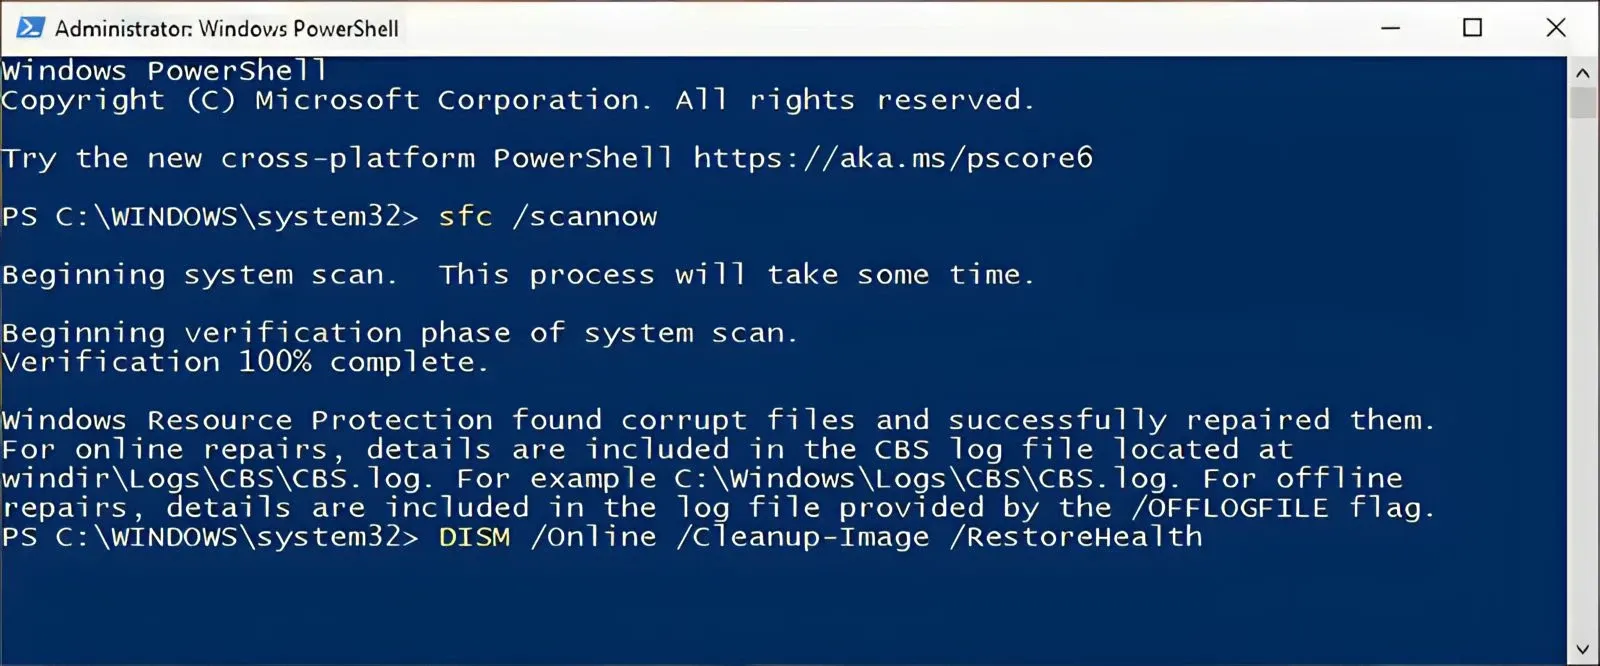
sfc /scannow

DISM /Online /Cleanup-Image /RestoreHealth
The next method is to execute the SFC & DISM commands in Windows PowerShell. Why have I included this method in the review?
Because there is a possibility that this issue is caused by a corrupted or missing file system. In this case, one way to fix it is by using the SFC and DISM commands. Please follow the steps below.
- First, press the Windows + X keys on the keyboard.
- Select Windows PowerShell Admin » click Yes to confirm.
- Next, type the command sfc /scannow » press Enter.
- Wait for a moment for the scanning and repair process.
- Once done, run the command DISM /Online /Cleanup-Image /RestoreHealth » press Enter.
- Wait for the process again.
- After that, restart the device to see the results.
- Done.
Note: The duration of the process depends on the specifications of your computer / laptop. Additionally, you can also apply these commands in the Windows Command Prompt.
See Also: 7 Ways to Fix Windows Laptop Screen with Lines
5. Checking errors on the hard disk
The next method is to check for errors on the hard disk. When your hard disk encounters issues, it's not surprising that some programs within the device are also affected. One of these is the Windows Explorer program, which often experiences "has stopped working" errors.
Therefore, examine the condition of your hard disk. Are there any bad sectors on the hard disk or similar issues?
Here are two methods to repair a problematic hard disk.
Use the CHKDSK command in Command Prompt

chkdsk d: /r /f- First, type "CMD" in the Windows 10 search bar » then right-click on the Command Prompt from the search results » select "Run as administrator" » click "Yes" to confirm.
- In the CMD window, type "CHKDSK d: /r /f" » press Enter.
- Wait for the process to complete.
- Feel free to reopen Windows Explorer.
- Done.
Note: The term "d:" represents the labeling of the Local Disk partition of the device (you can use another disk you want to check). If you'd like to understand the function of the above command, you can find its explanation below.
/r Detects bad sectors and attempts to recover any readable information from them.
/f Fixes any errors found on the disk.
Through Properties
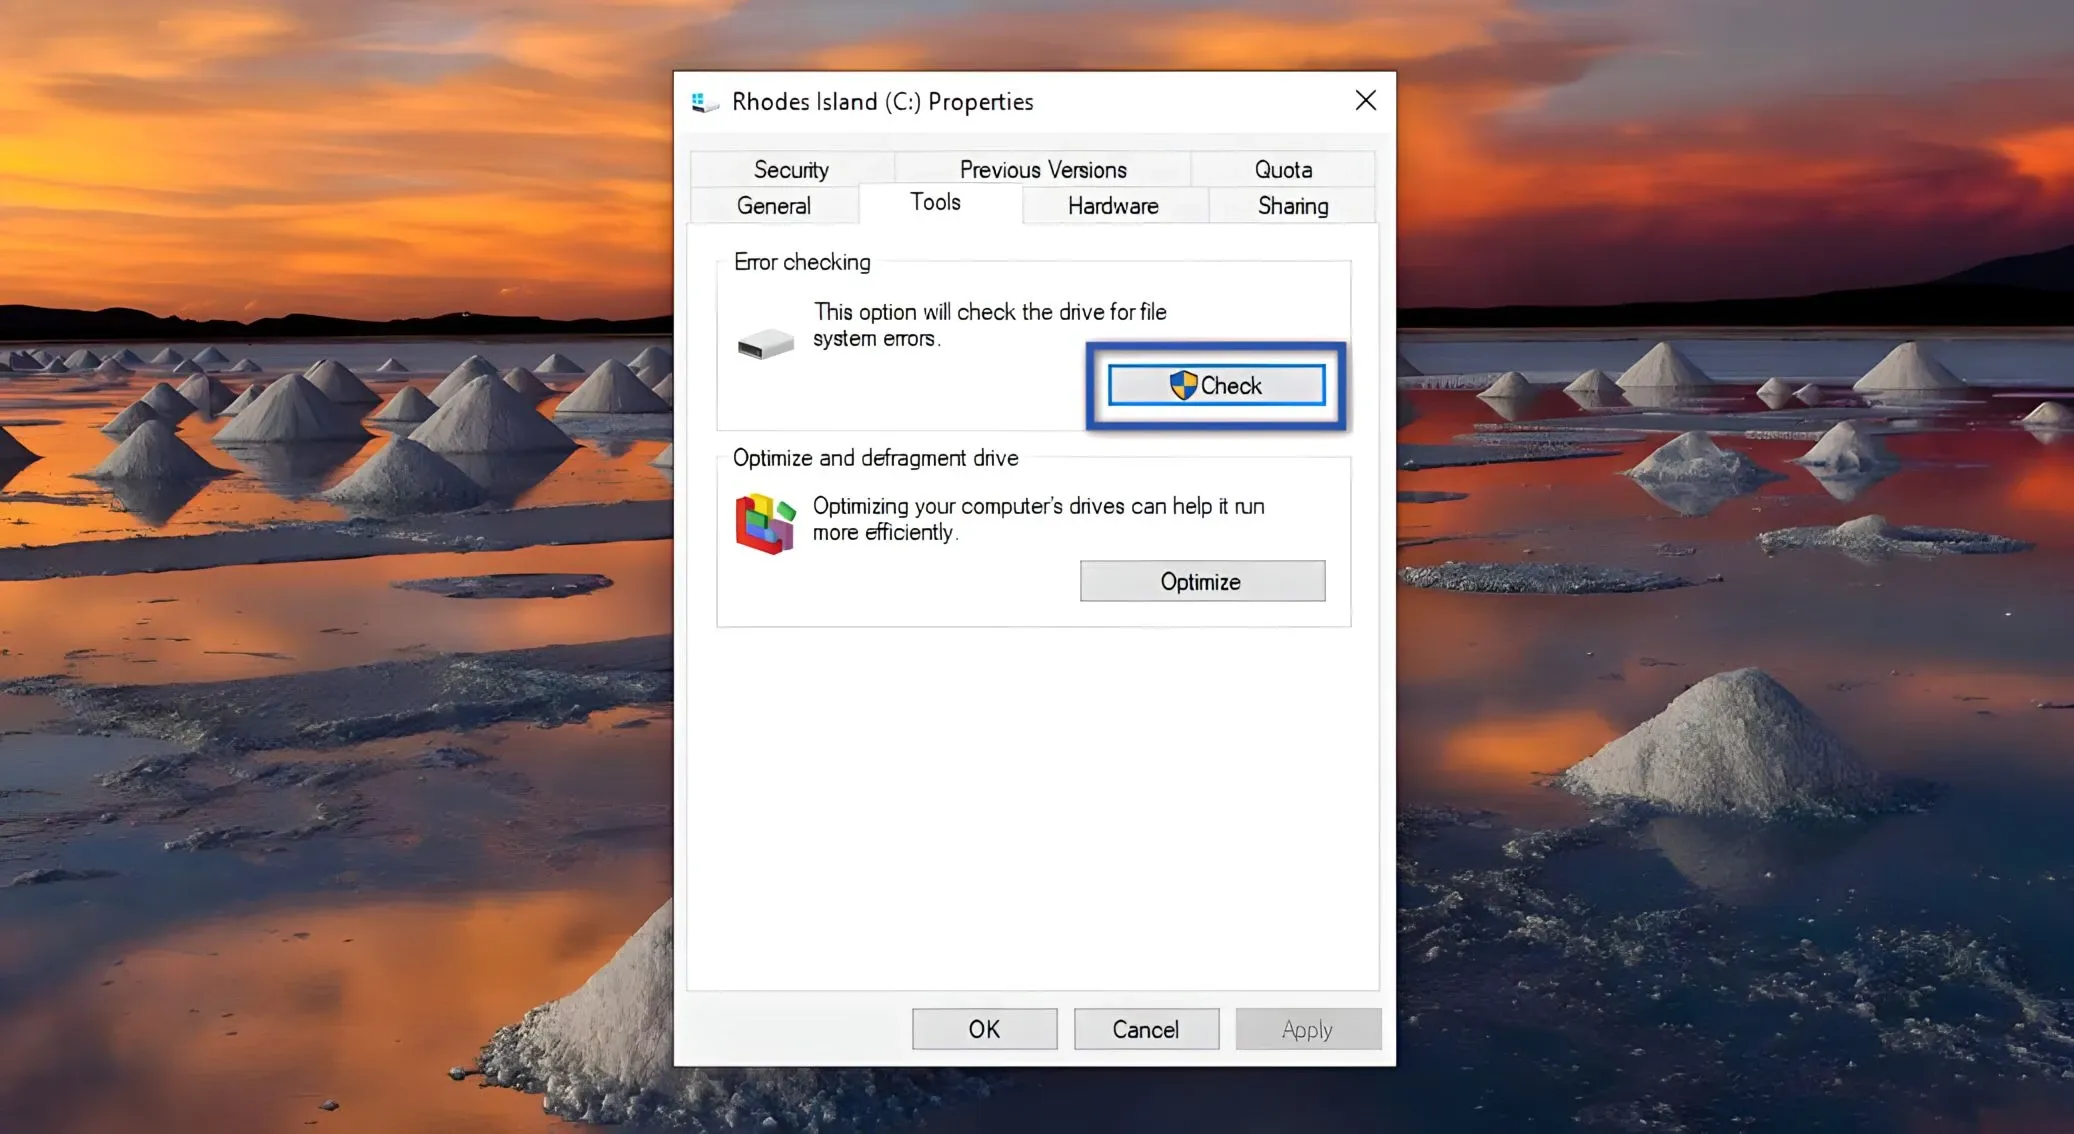
- First, open Windows Explorer, then click on This PC and select the Drive you wish to check.
- Right-click on the Drive, choose Properties, and click on the Tools tab.
- In the "Error Checking" section, click on Check, then click on Scan Drive.
- Wait for a few moments while the scanning process takes place.
- Done.
Note: If Windows detects issues with the drive, you can decide whether you want to fix them or not.
Also See: 9 Ways to Resolve Windows Defender Cannot Be Turned Off
6. Clearing Cache Thumbnails and Disabling Them
There are several scenarios where you might encounter the "Windows Explorer has Stopped working" issue, one of which is when opening specific files, especially image files. If that's the case, it can be confirmed that this problem is caused by corrupted thumbnails.
There are two methods you can employ to rectify this: clearing the thumbnail cache and disabling thumbnails. Here are the steps!
Clearing Cache Thumbnails
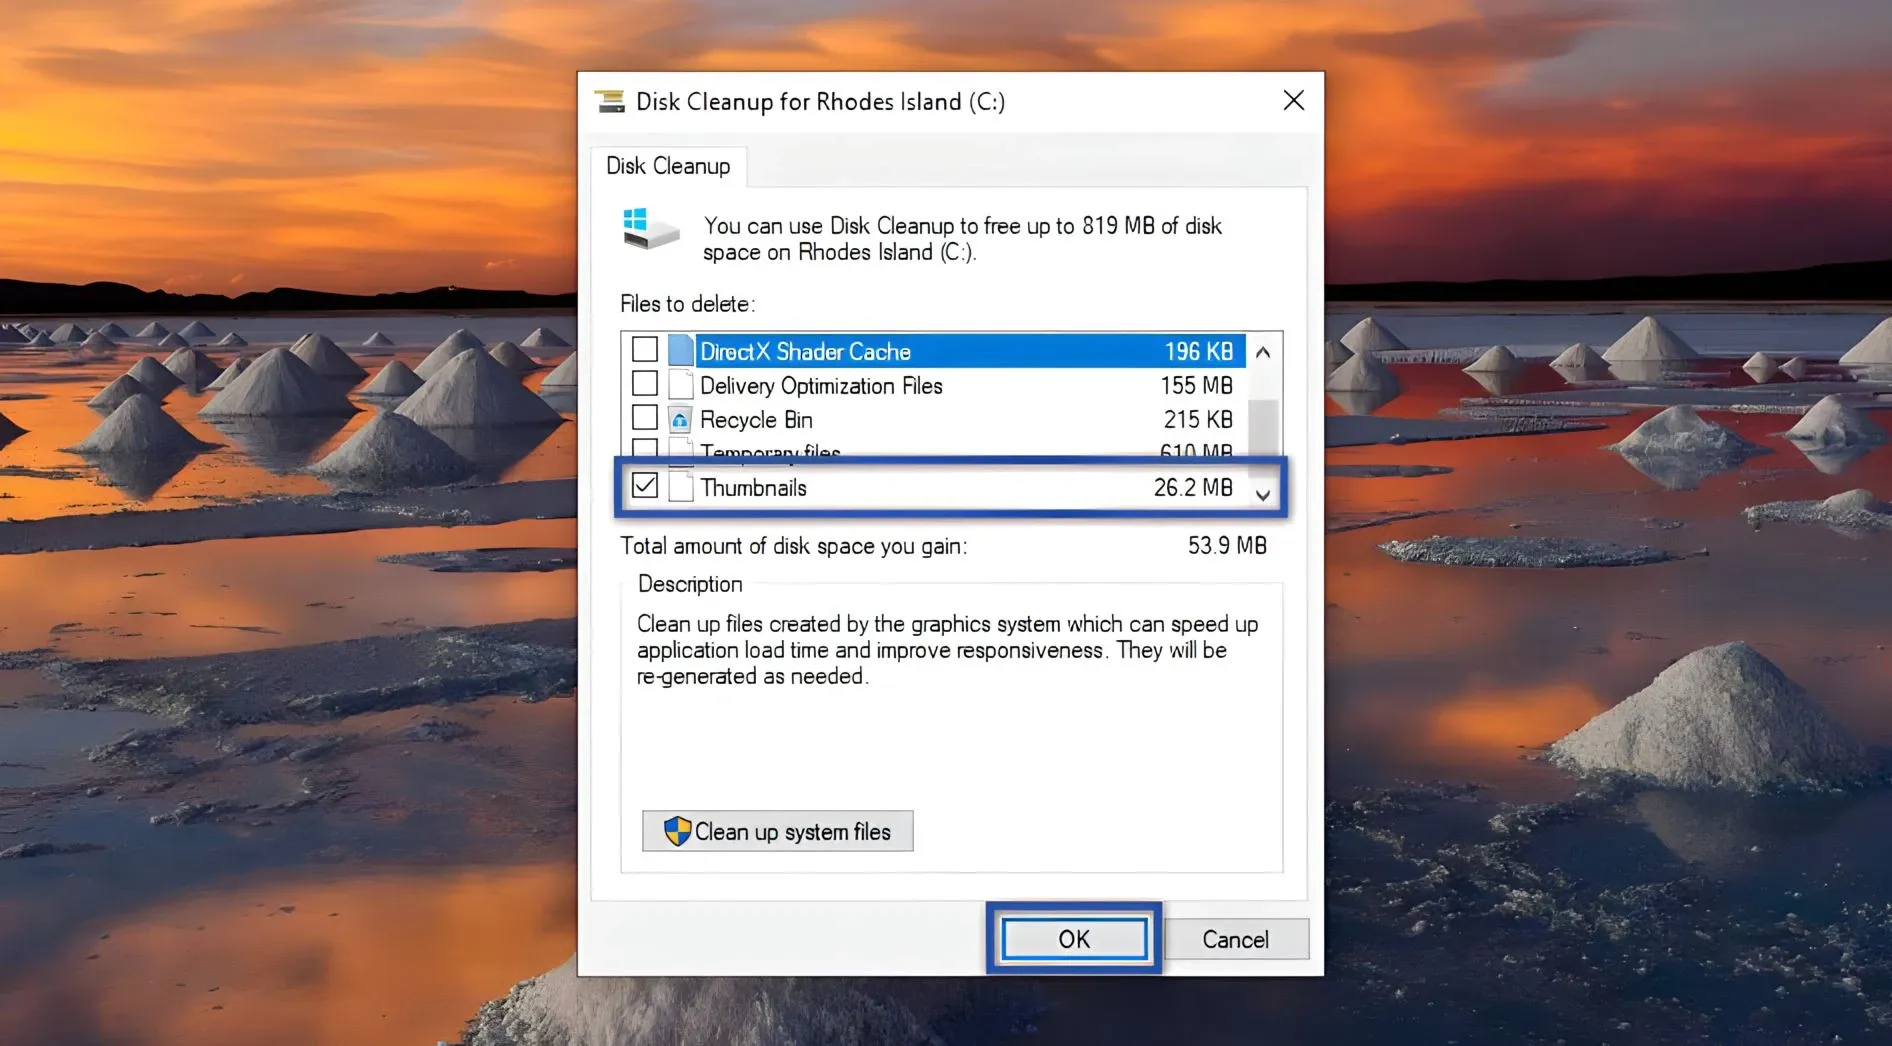
- First, click the Start menu on your Windows taskbar.
- Next, type "disk cleanup" into the search field, then click on Disk Cleanup from the search results.
- Once open, the Drive Selection dialog will appear; choose Drive C from the dropdown menu and click OK.
- Wait for the file calculation process to complete.
- Afterward, locate and check the Thumbnails option from the list of file cleaner checkboxes, then click OK.
- Once the thumbnail cache has been cleared, please review your image/video files again.
- Done.
Temporarily Disable Thumbnails
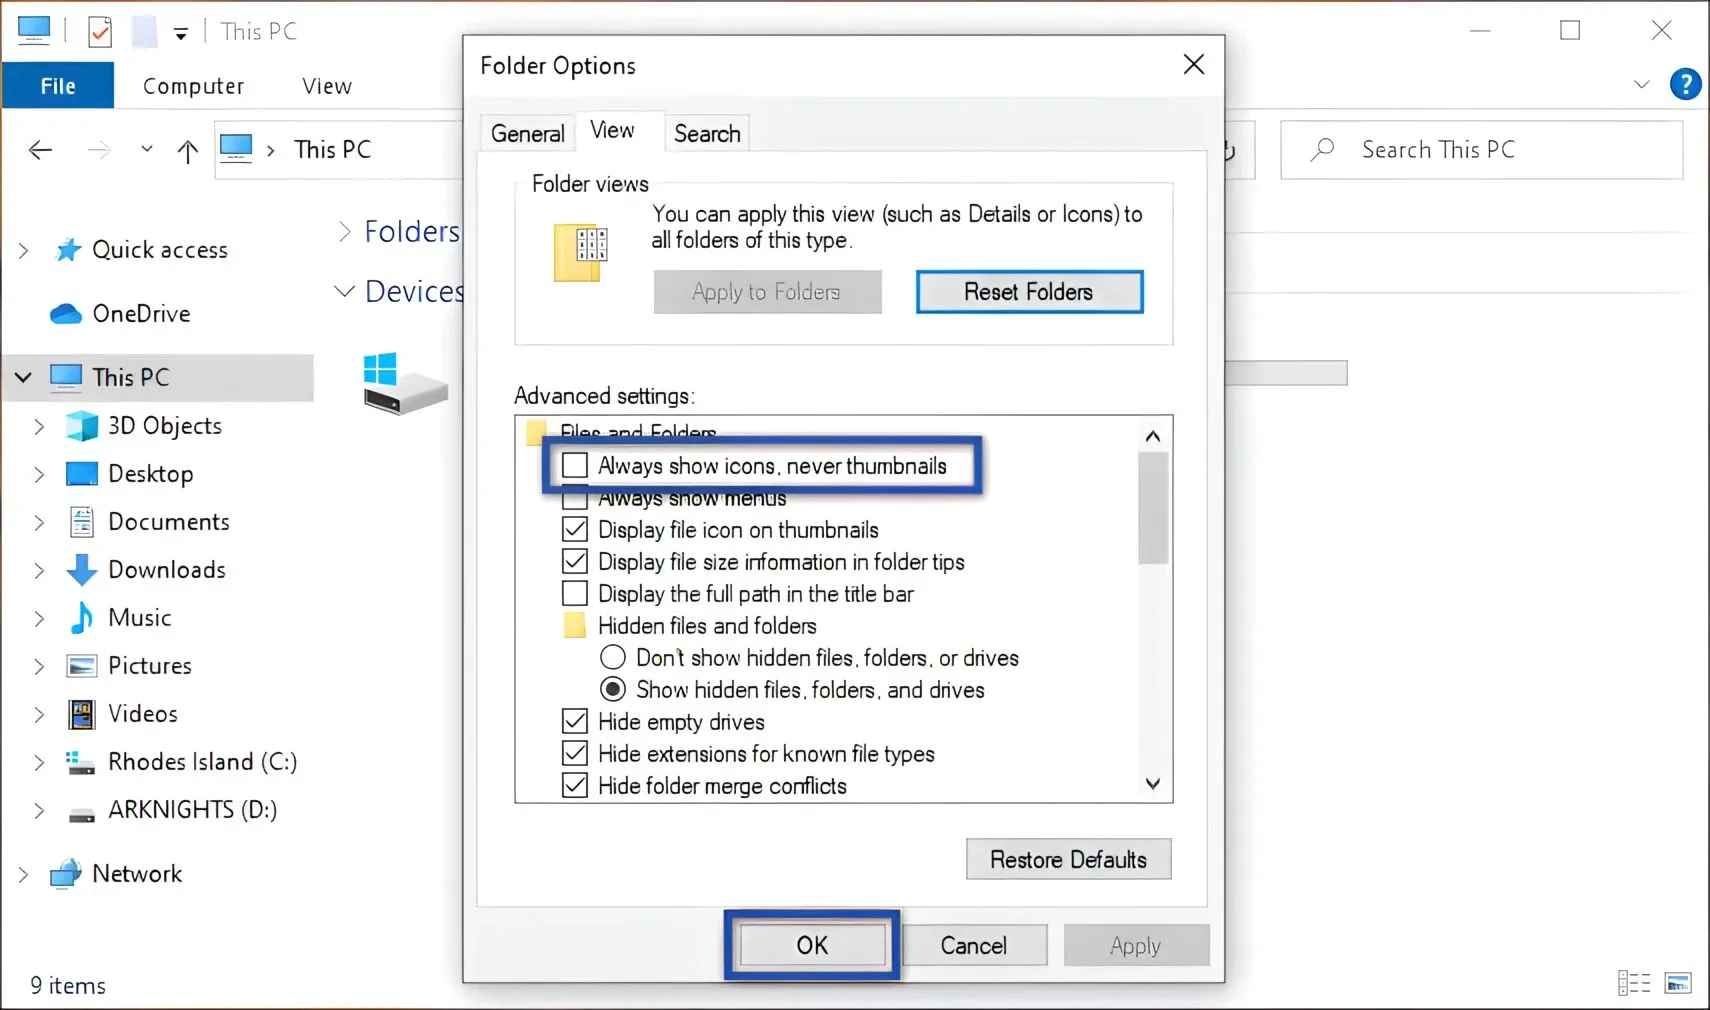
- Firstly, open Windows Explorer, then select the File menu followed by Change folder and search options.
- Next, click on the View tab, check the "Always show icons, never thumbnails" option, then click Apply and OK.
- Afterwards, attempt to access the troublesome file.
- Finished.
7. Perform a Clean Boot on Your Windows OS
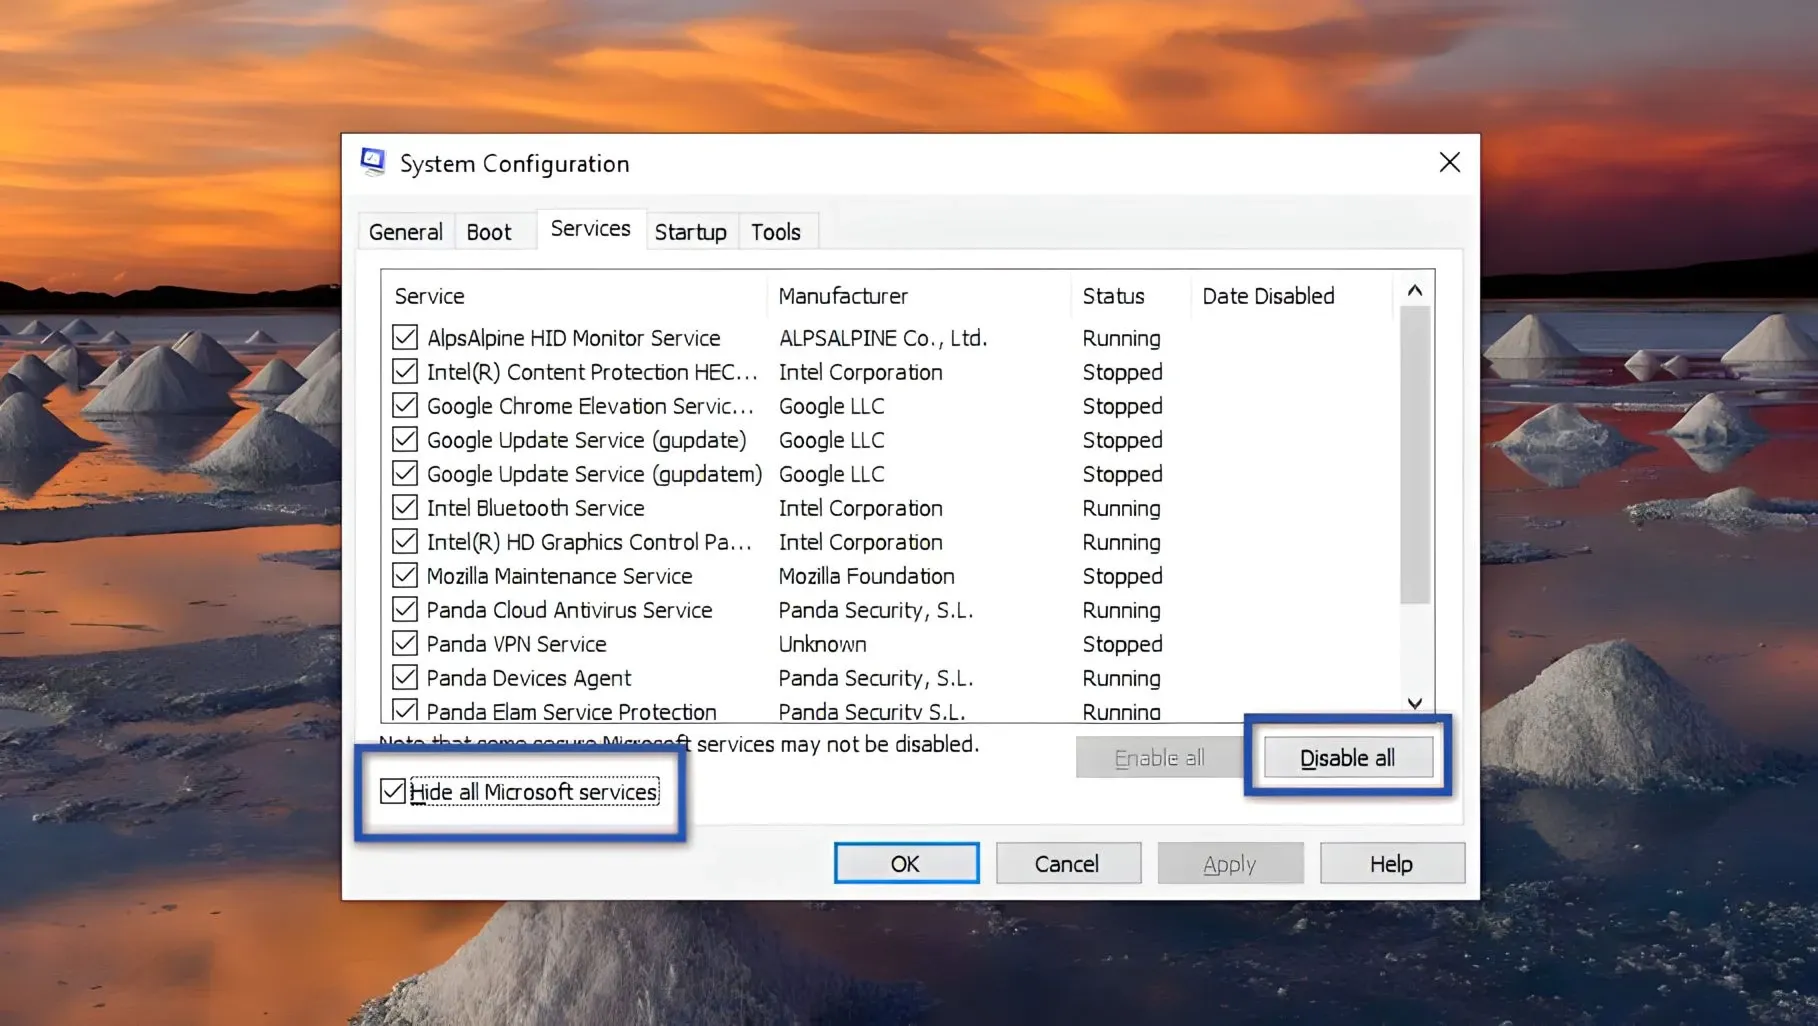
msconfigNext, you can also perform a Clean Boot on Windows. The reason this method is recommended is due to the possibility that the issue might be caused by conflicts between services or programs.
Although it might seem simple, in fact, this method is often chosen as an option to troubleshoot problems on Windows. One of these issues is Windows experiencing a Black screen. Here's how you can do it!
- First, press Windows + R to open the Run window.
- Next, type msconfig in the search field and press Enter / OK.
- Once the System Configuration dialog appears, click on the Services tab.
- Check the "Hide all Microsoft services" box » click Disable all » Apply » OK.
- After that, restart your computer to see the changes.
- Done.
See Also: 10 Ways to Fix Missing Thumbnail Images on Windows
8. Run Windows Memory Diagnostics
The issue with Windows Explorer is not only caused by system errors or related programs. However, there is a possibility that this issue is due to faulty hardware, especially in the RAM section. To ensure the condition of the RAM, please execute the following Windows Memory Diagnostic feature.
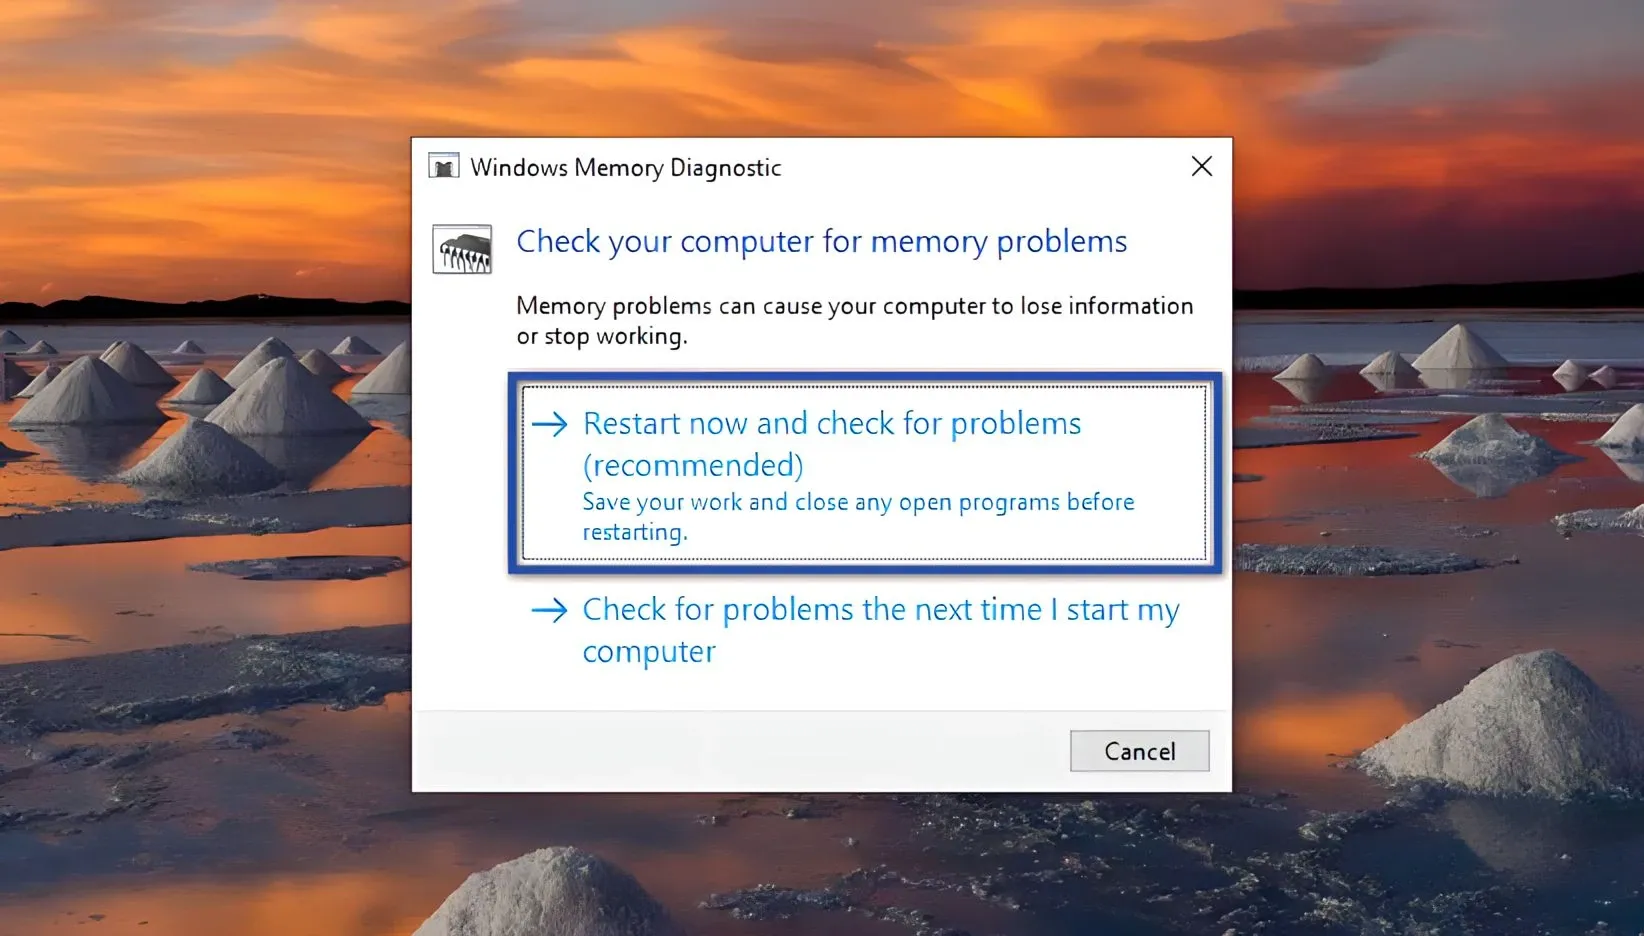
- First, click the Start menu » then type "memory" in the search field.
- Once done, click on Windows Memory Diagnostics from the search results.
- After a new dialog box appears, please click "Restart now and check for problems."
- Wait for the process for a few moments.
- Done.
To view the results of the previous diagnosis, you can follow these steps:
- First, press Windows + X » select Event Viewer » click Yes to confirm.
- Once done, a new window will appear » then on the left panel, click Windows Logs » System.
- Next, look at the "Actions" panel on the right, click the Find menu » type "MemoryDiagnostic" » click Find Next.
- If found, it will appear in the list in the "System" panel.
- Double-click the entry to view the results of the previous Windows Memory Diagnostic run.
- Done.
See Also: 8 Ways to Disable Windows Startup Programs
9. Try scanning with antivirus
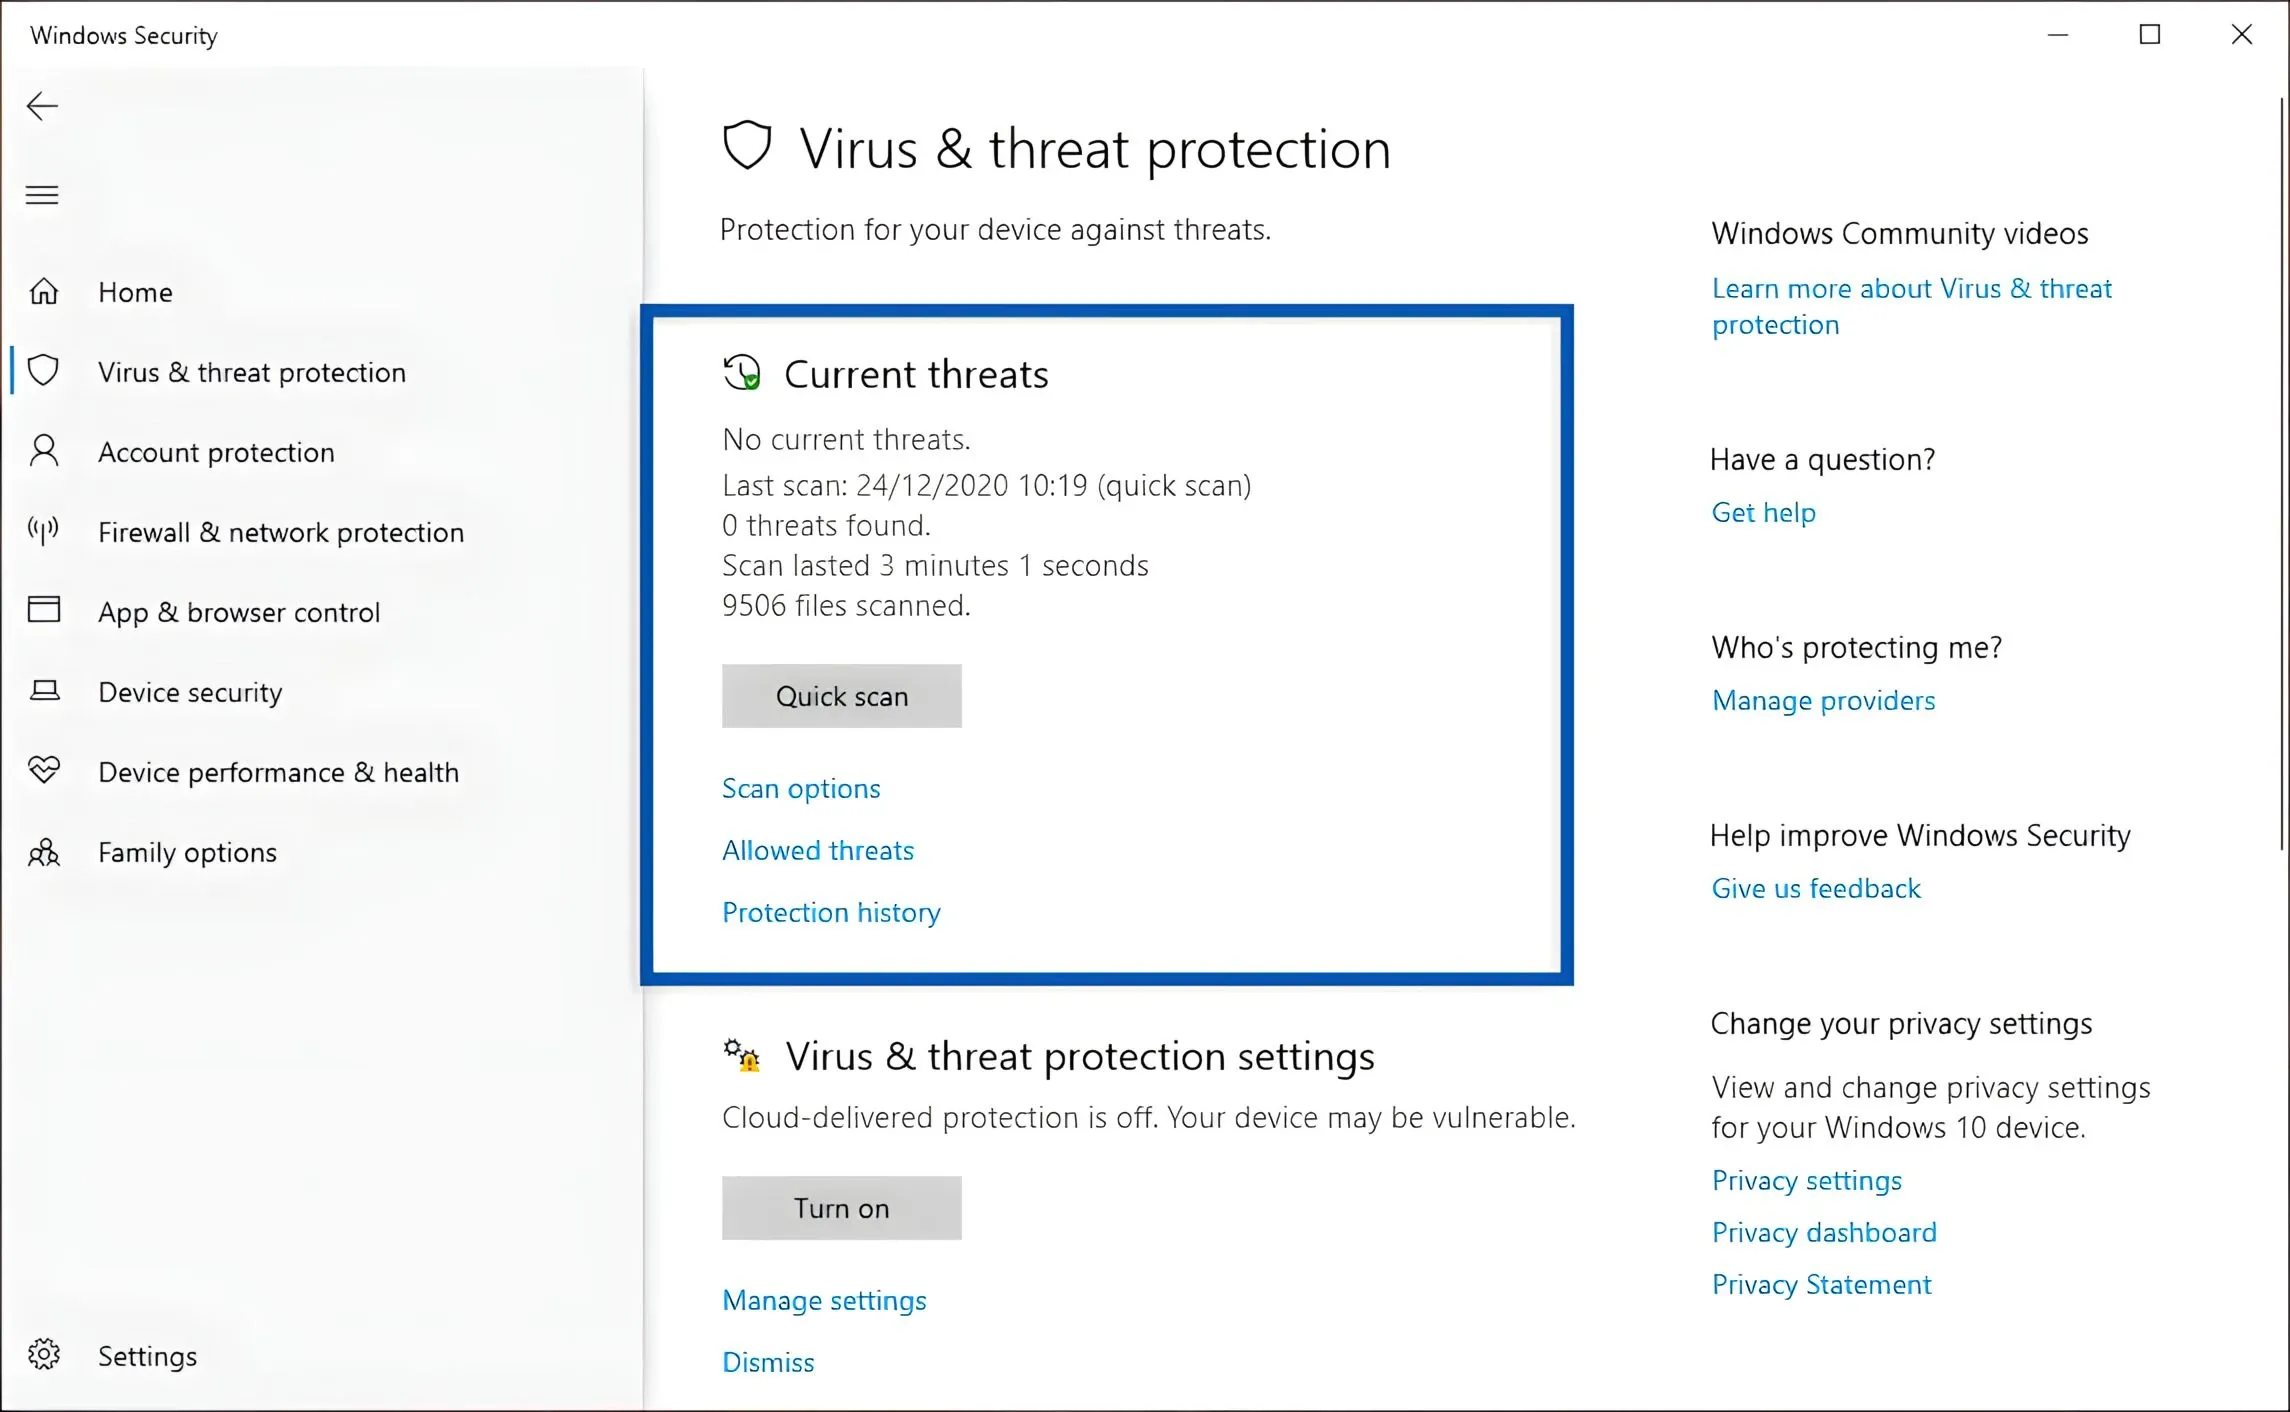
It's a different story when your device gets infected with a virus/malware; it's no wonder that it can lead to instability in several programs, including Windows Explorer. Considering that viruses themselves are capable of altering files within the system, resulting in various issues. To make sure, you can perform a thorough scan using an antivirus application.
- First, open the menu "Settings" » "Update & Security" » "Windows Security."
- Then, click on "Open Windows Security" » "Virus & threat protection."
- Click on "Quick Scan" to initiate the scanning process.
- Wait until the scanning process is completed.
- Done.
10. Run Windows Update
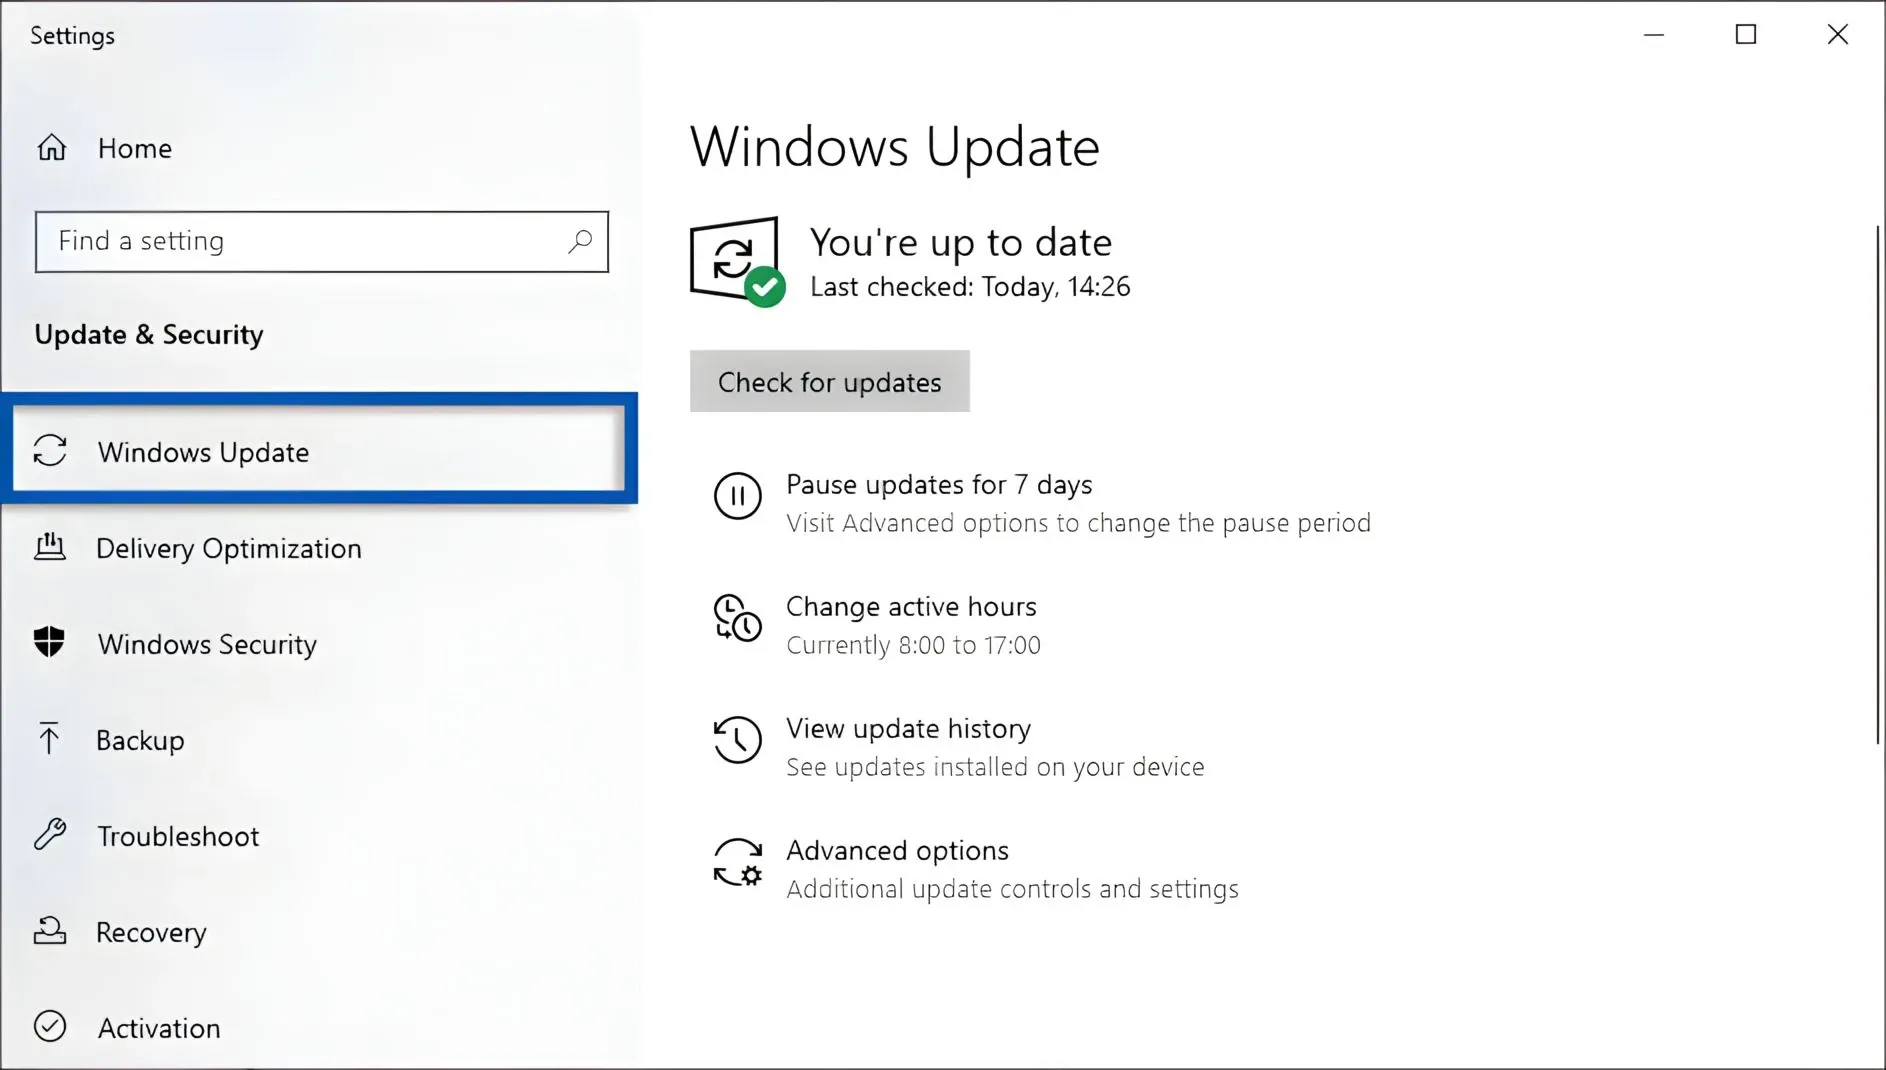
The "has Stopped working" issue with Windows Explorer may be caused by failures during Windows Update. To fix this, you simply need to perform updates to ensure that the device can run smoothly and optimally again.
- First, click the Start menu on your Windows PC.
- Then click Settings » select Update & Security.
- Next, click the Windows Update menu » choose Download and Install.
- Wait for the download process for a few moments.
- Once done, please restart the device to install the updates.
- Done.
See Also: 12 Ways to Fix "Can't Connect to this Network" WiFi Windows
11. Run System Restore
If the previous methods still do not resolve the issue of "Windows Explorer has Stopped working," you can utilize the System Restore feature in Windows.
This feature serves to revert the system's data to a specific point in time. However, there are prerequisites you need to fulfill in order to use this feature. One of them is having a restore point.
Without a restore point, you won't be able to use it. Furthermore, make sure you have backed up your data before attempting to execute System Restore. Because once you do, all the data within the system will be reverted to that time, including the potential loss of some application programs.
12. Reset Your Windows PC
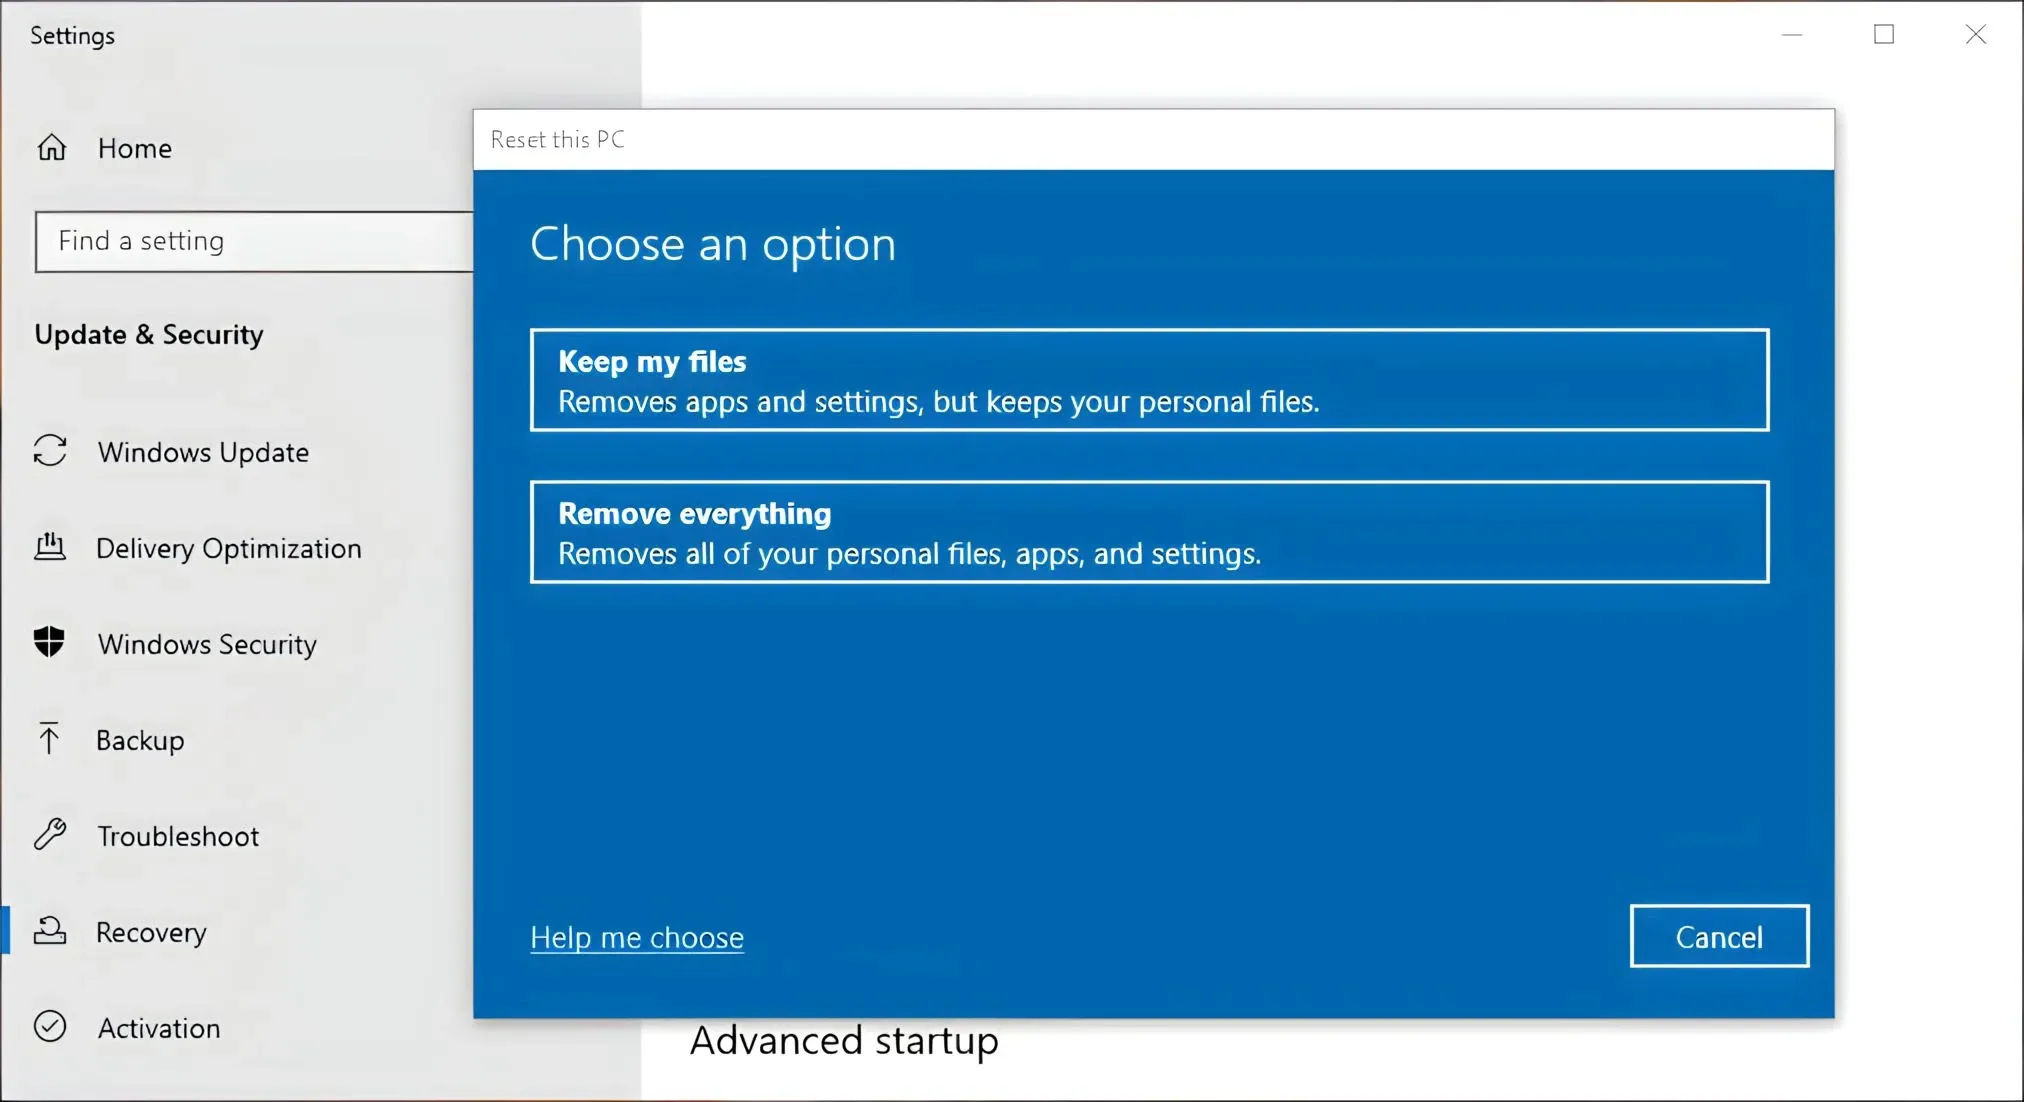
In addition to using System Restore, you can also perform a PC reset to resolve issues within Windows Explorer. It's important to note that this PC reset is quite similar to reinstalling your Windows OS. However, with the PC reset, you have the option to select personal files that you don't want to delete on Drive C. Here are the steps!
- First, click the Windows 10 Start menu.
- Then click on Settings » select Update & Security.
- Once there, click on Recovery in the left panel » then click Get Started.
- Afterward, a new dialog will appear. Please click on the option "Keep my files" or "Remove everything" » then click Reset.
- Wait for the process to complete.
- Once done, please restart your laptop.
- Done.
If you're unfamiliar with the meaning of the previous options, you can find the information below.
Keep my files: Removes apps and app settings, but retains your personal files.
Remove everything: Deletes all personal files, apps, and Windows settings you've made.
See Also: 10 Ways to Uninstall Unremovable Windows Applications
Closing
Windows Explorer is indeed one of the features that we often use for various file-related purposes within the Windows system. However, what if Windows Explorer is experiencing problems? It would certainly be very frustrating. Such issues will prevent users from accessing folders and files stored on the computer.
With the explanations and solutions provided above to address Windows Explorer issues, it is hoped that problems can be resolved effectively and promptly, allowing Windows Explorer to function normally once again.
If you have any questions or opinions to convey, please write them in the comment section below. Thank you and good luck!
What are the main causes of File Explorer being unable to open?
Generally, this problematic File Explorer is caused by issues within the system. However, some users also believe that this problem could be triggered by the presence of viruses/malware.
How to address File Explorer not responding?
There are several solutions you can implement to fix a non-responsive File Explorer, such as restarting File Explorer, running SFC, performing antivirus scans, and cleaning up system file cache/junk.


