Although Windows 10 is considered the most widely used operating system and is the preferred choice for computer/laptop users today, there are still numerous challenges that you might encounter while using Windows 10. One of the issues among them is Windows 10 suddenly becoming slow, sluggish, frequently freezing, and experiencing lag during activities.
These problems are typically marked by various error messages that appear, such as screen freezing, programs stopping to work, unresponsive applications, and even applications failing to open. If you encounter such situations, one of the approaches you should consider is improving the performance of your Windows device to make it faster and lighter.
See Also: 8 Ways to Address Unwanted Browser Launches During Startup
Causes of Windows 10 being slow, freezing, or lagging
There are several factors that cause Windows 10 to become slow and experience lag. For instance, this can be due to inadequate PC specifications, infrequent Windows updates, presence of damaged/missing system files, full storage, and exposure to virus attacks. For a clearer understanding, please refer to the comprehensive explanation below.
- Insufficient device specifications - When your device specifications are not sufficient to run Windows 10, it's no wonder that the system runs slowly or sluggishly. Sometimes, users force their devices to run Windows 10 even if their specs are not optimal, like a laptop with only 2GB RAM. It might install, but won't perform optimally when used.
- Failure to perform Windows updates - According to some users, Windows Updates are unnecessary. They believe that doing updates could slow down the device. However, updating the operating system provides new features, bug fixes, improved performance, and enhanced security.
- Corrupted system files - Additionally, corrupted system files can be a reason why Windows 10 doesn't run optimally. To fix these file corruptions, you only need to execute the SFC and DISM commands.
- Problematic drivers - Not only that, but having problematic drivers can lead to various issues in the system, including Windows 10 frequently experiencing slowness or freezing. To ensure there are no problematic drivers, you can access the Device Manager.
- Full storage - As a computer/laptop user, you are likely aware that storage capacity affects system performance. In other words, if your storage space is full, the system might not run optimally.
- Excessive multitasking activities - Running too many programs simultaneously can burden RAM and CPU performance. This is especially true when running resource-intensive programs like Adobe Photoshop, Adobe Illustrator, Adobe After Effects, and similar software.
- Virus/malware infection - Having viruses or malware on your computer can cause various issues in the system. Considering that these viruses can alter or delete system files and applications, they can lead to Windows 10 feeling slow or laggy.
See Also: 10 Ways to Overcome Laptop Restarting on Its Own in Windows
How to Fix Windows 10 Slow Performance, Frequent Freezing, and Lag
To address the issue of a slow, frequently freezing, or lagging Windows 10 system, there are several methods that can be employed. These include performing software maintenance and upgrading hardware with a larger capacity. If you desire a fast and optimal performance from Windows 10, please review and follow the tips outlined below.
1. Ensure Adequate Device Specifications
The initial step you should take is to examine your device's specifications. Why is this necessary?
As we are aware, Windows 10 has system requirements that have been set to ensure optimal operation on your device. For example, as seen on the microsoft.com website, it is stated that Windows 10 requires a minimum of 1GB of RAM for 32-bit systems and 2GB for 64-bit systems.
Moreover, it is important to consider the programs installed on your device. Some Windows users tend to push the system's performance beyond its limits, leading to various issues. Therefore, if you intend to use Windows 10, I recommend utilizing a minimum of 4GB of RAM or more.
2. Check Storage Space
And if indeed your device's specifications are sufficient to run the Windows 10 operating system, but you still experience freezing or slowness, then there are several factors that need to be examined on your device, one of which is storage space. Why is that? Because when storage space is full, it's not surprising that the system's performance will slow down and even often experience freezing.
Therefore, it is highly recommended that you leave empty space on Drive C of your device, at least 20%. This is because the system also requires free space to run stably and optimally. And if your storage is indeed full, please uninstall applications or delete files that are not needed.
See Also: 9 Ways to Fix Blank White Laptop Screen on Windows
3. Reduce Multitasking Activities
One of the reasons Windows 10 becomes slow is running too many multitasking programs without considering the device's resources. Indeed, multitasking features function to ease users in accessing programs simultaneously at one time.
However, on the other hand, the more programs you open simultaneously, the system's performance will be divided. Considering the usage of RAM and CPU resources will be burdened, causing the device's response to become slow or even frozen. Therefore, use the multitasking feature wisely and adjust it to your device's resources.
4. Clean Up Temporary Windows Files
The next method is to clean up temporary files in Windows 10. Temporary files or cache files serve to facilitate users in opening and running applications. Despite their useful benefits, the abundance of temporary files stored on your computer/laptop can also have a negative impact on the system. One of them is that it can fill up memory, cause conflicts and errors, leading to slow performance. Therefore, it is highly recommended to clean up temporary files regularly.
Deleting Windows Junk Files
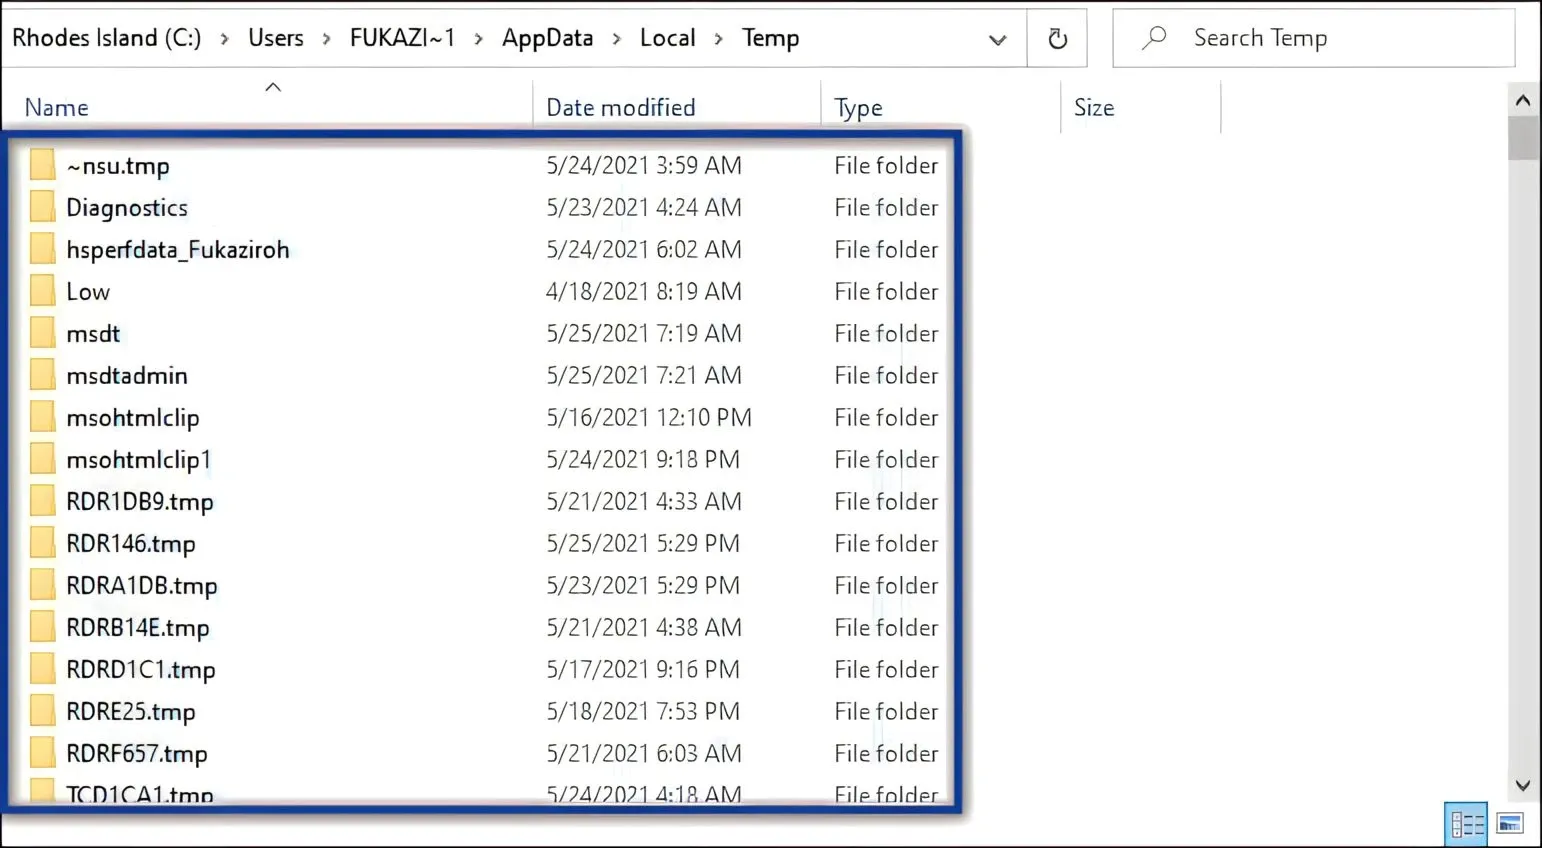
%temp%
- First, press the Windows + R keys to open the Run window.
- Next, type
%temp%and press OK/Enter.
- Once done, a new window will appear.
- Then, delete all data found in the temp folder.
- Afterward, restart your device to see the changes.
- Done.
Running Disk Cleanup
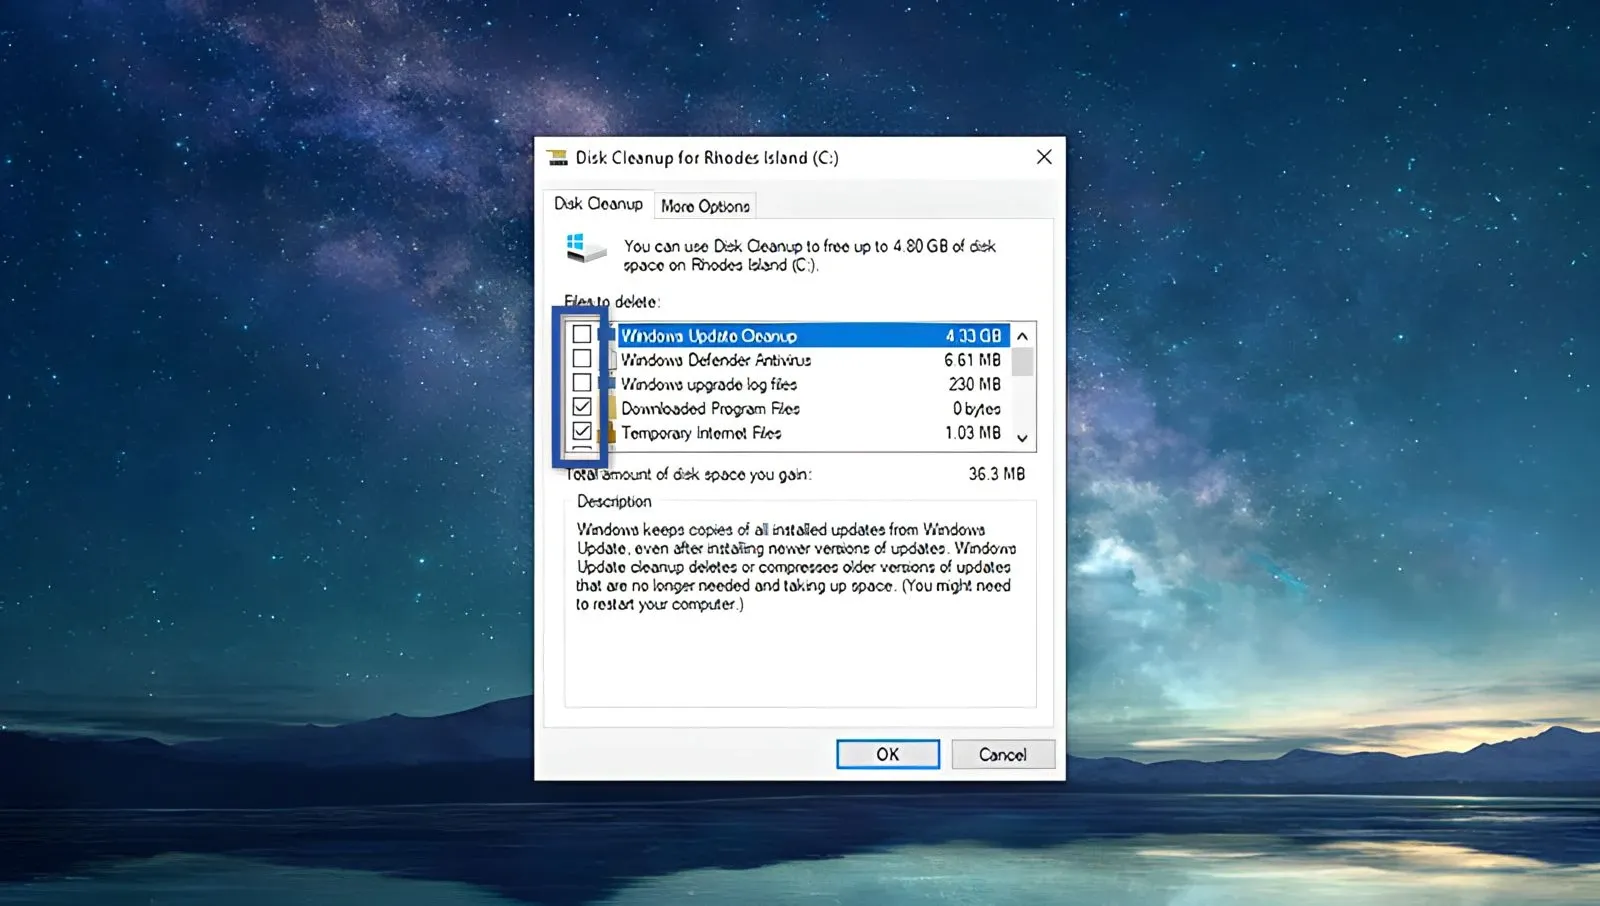
- First, click the Start menu on your Windows taskbar.
- Next, type "Disk Cleanup" in the search bar, then click on Disk Cleanup from the search results.
- Once done, the Drive Selection dialog will appear. Choose Drive C from the dropdown menu, then click OK.
- Wait for the file calculation process to complete.
- After that, check the options you want to clean in the list of checkboxes, then click OK.
- Finally, restart your device.
- Done.
In addition to the two methods above, you can also use utility software to help you clean up cache files and Windows registry files. For instance, with software like CCleaner, AVG TuneUp, and similar ones.
See Also: 7 Ways to Fix Windows Laptop Screen with Lines
5. Turn off some Windows 10 visual effects
When your device often feels sluggish during operation, it may be because your device is not quite adequate to run Windows 10. In this case, Windows users usually address this by disabling visual effects to speed up system responsiveness. To do this, you can follow these steps.
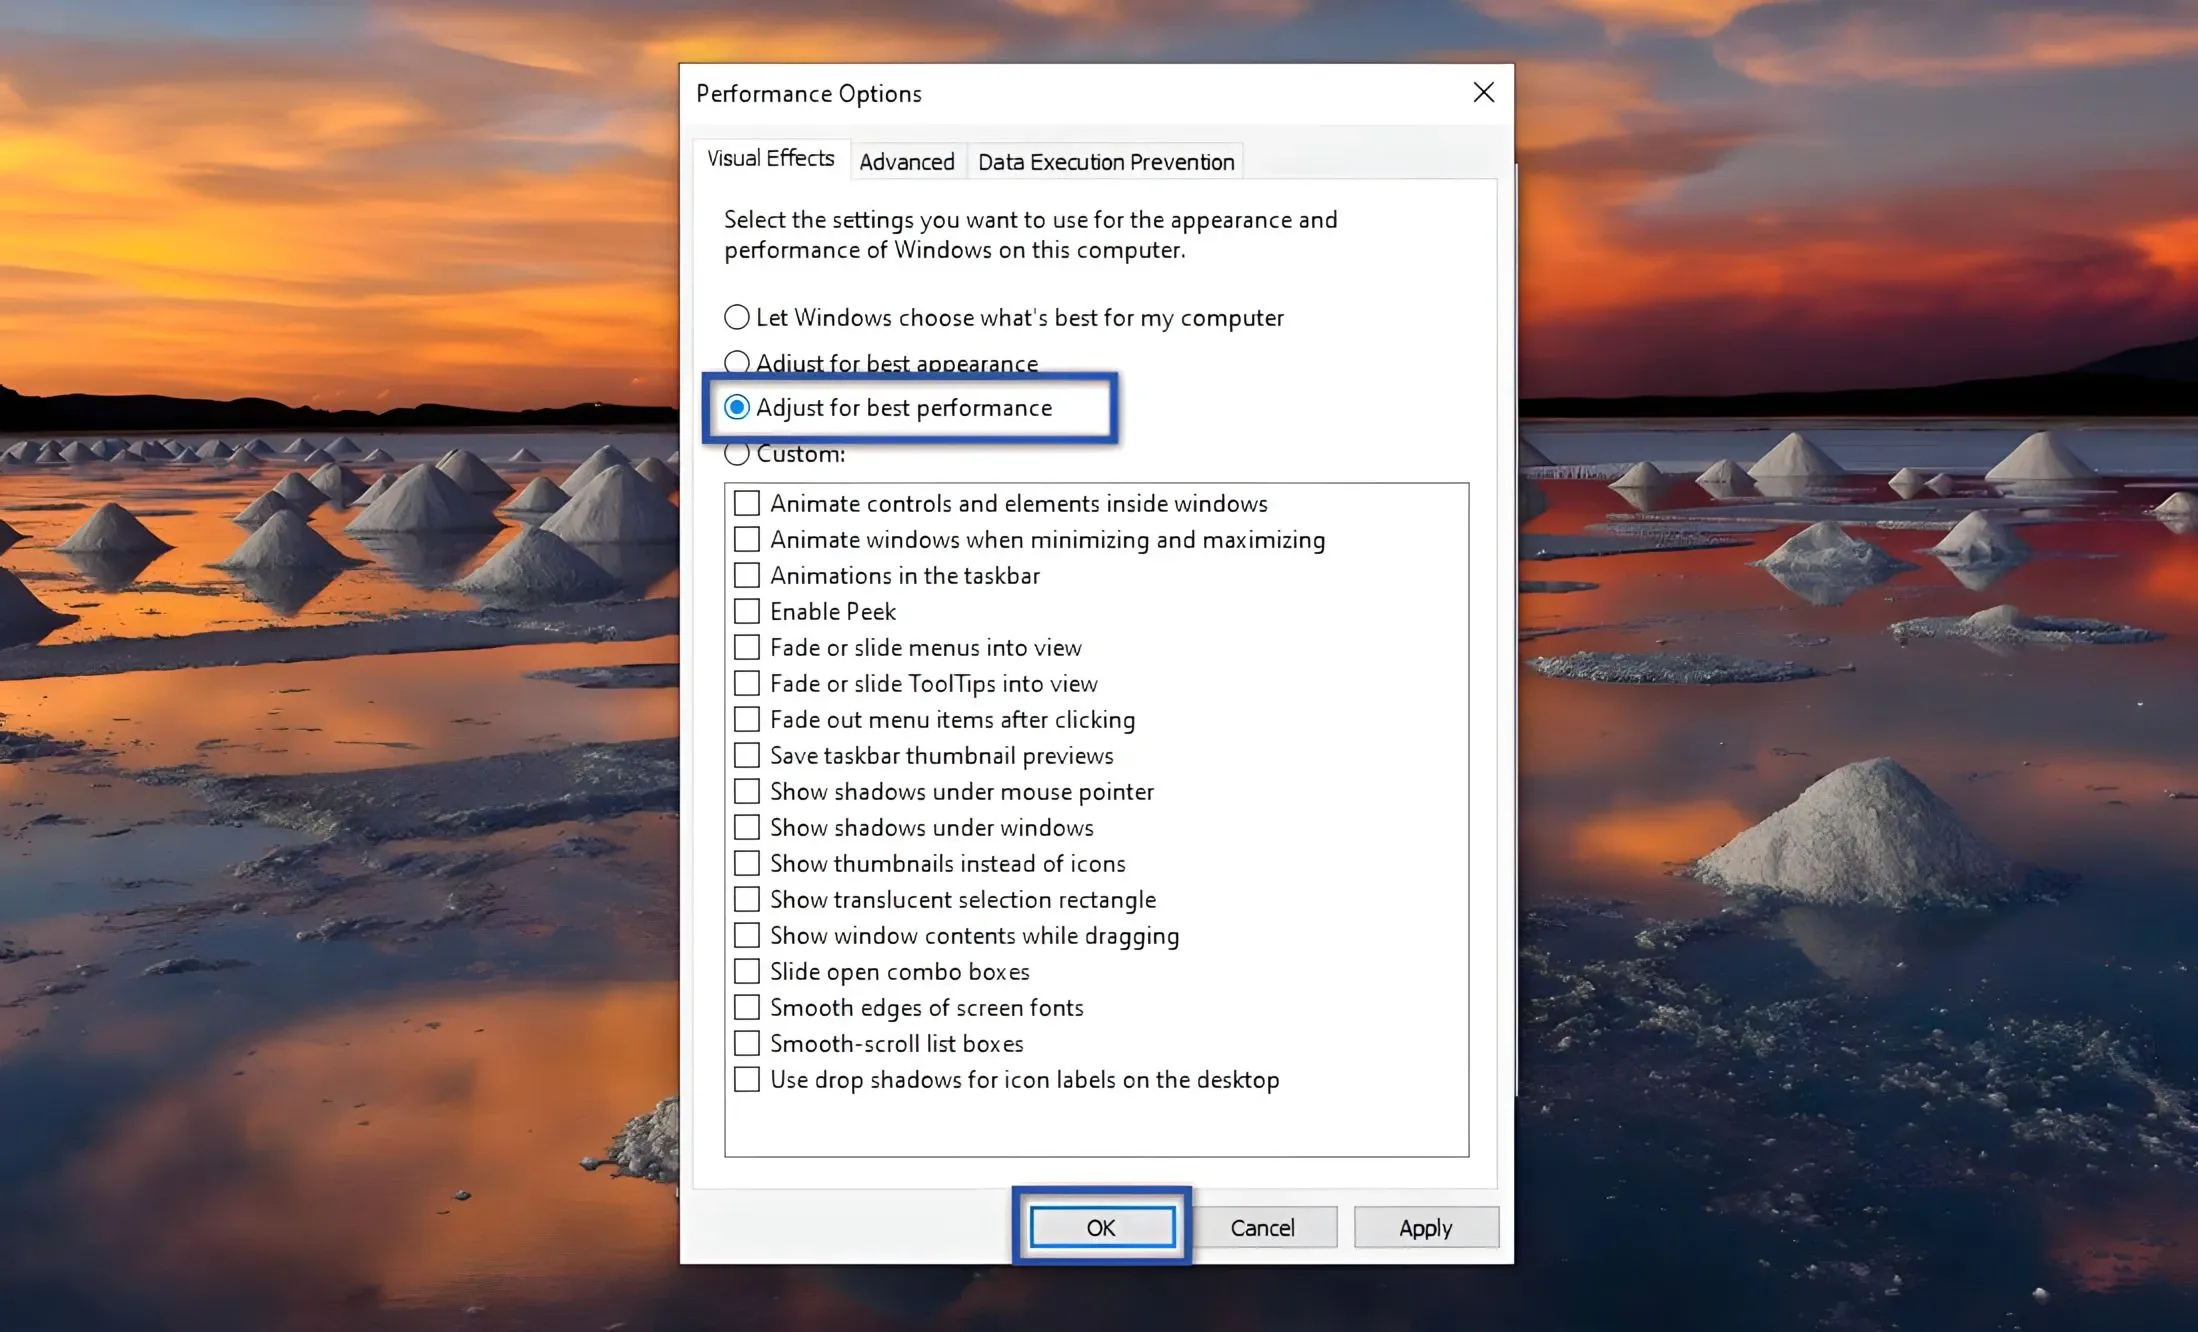
- First, click the Start menu on your Windows 10.
- Then type "advanced system" in Windows Search » click "View advanced system settings" from the search results.
- Once done, click "Settings.." in the Performance section.
- After the new dialog appears, click the option "Adjust for Best performance" » click "Apply" » "OK".
- Done.
In addition to turning off some visual effects on Windows, you can also eliminate the transparency feature in Windows 10. Of course, this is done to improve Windows 10's performance, especially to speed up Windows booting.
Disable transparency feature
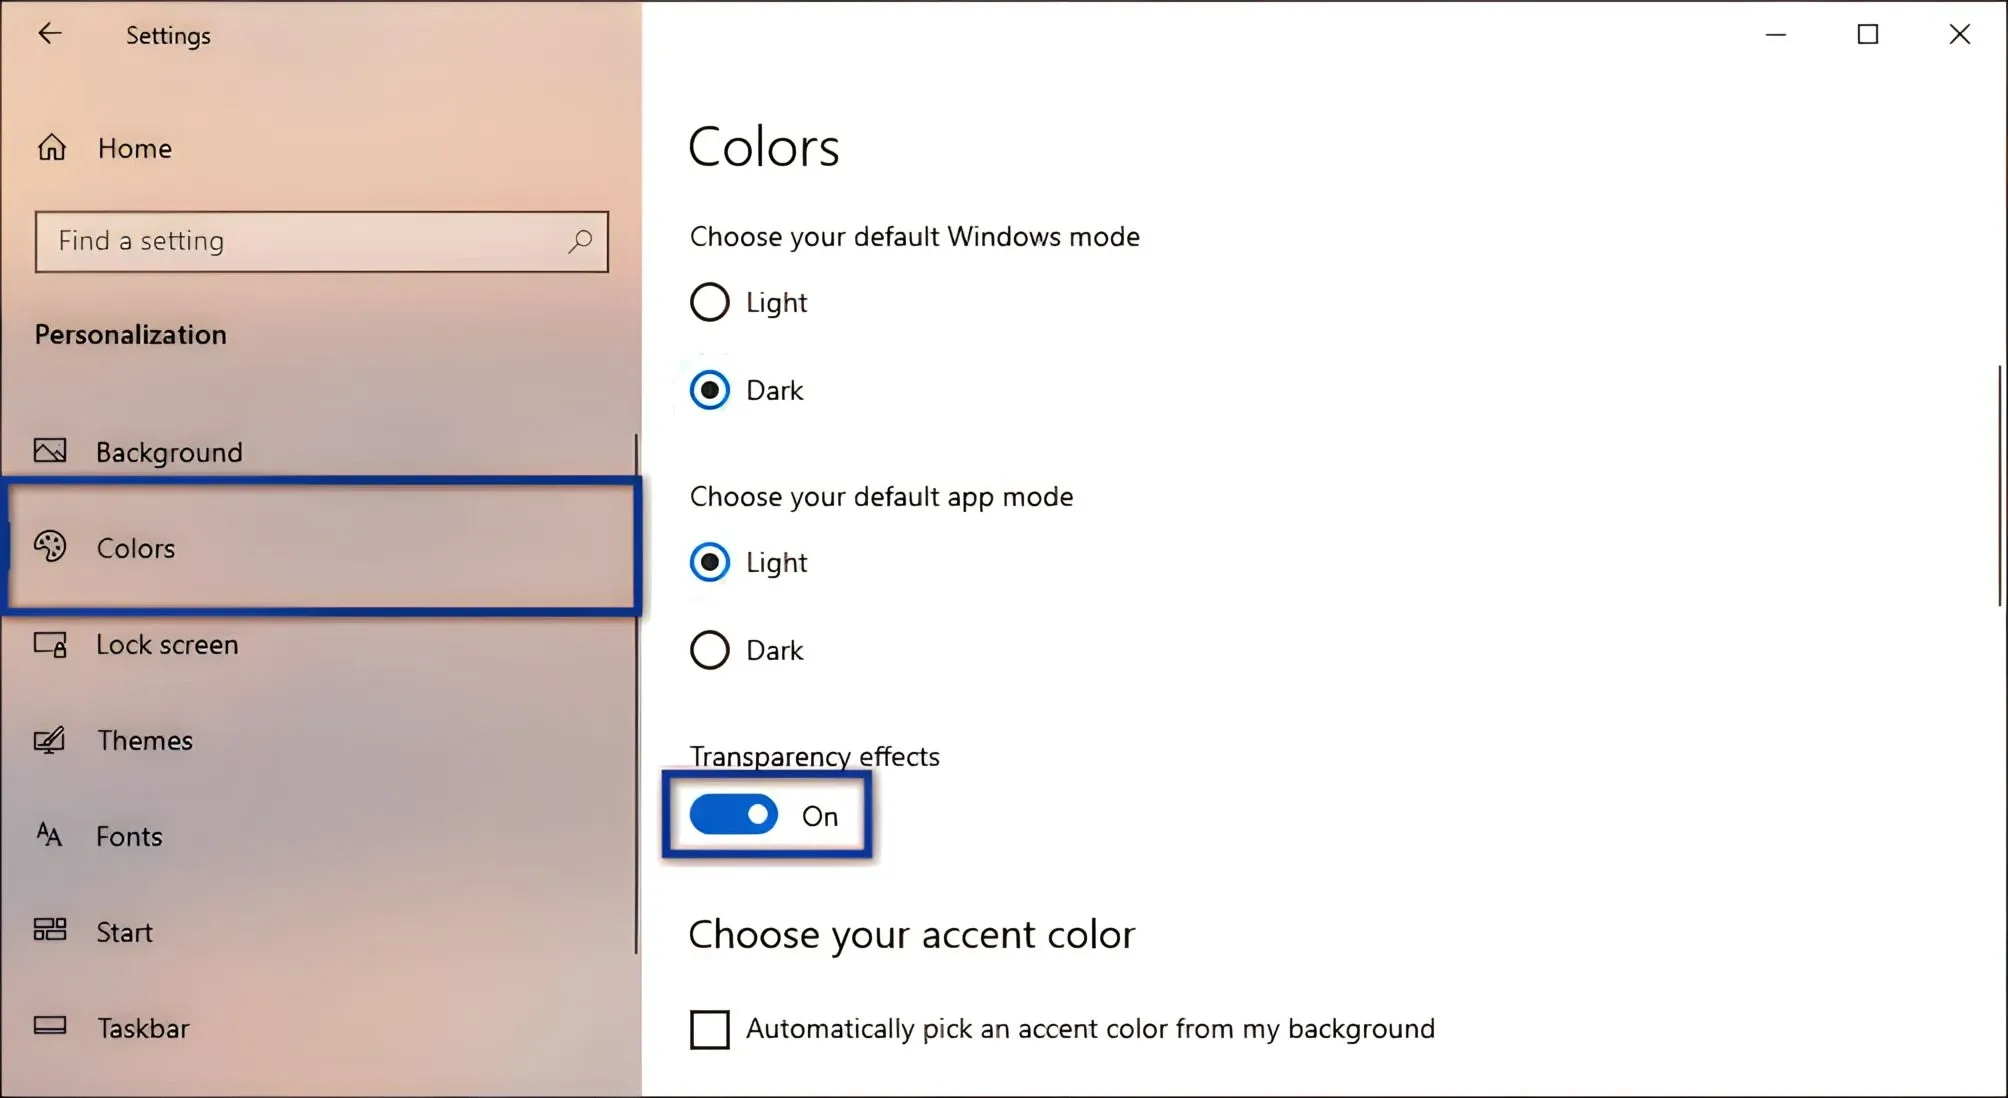
- First, click the Start menu on your Windows 10.
- Next, click the Settings icon » select the Personalization option.
- Once done, click the Colors menu » then change the Transparency effect option to Off.
- Done.
6. Check device drivers
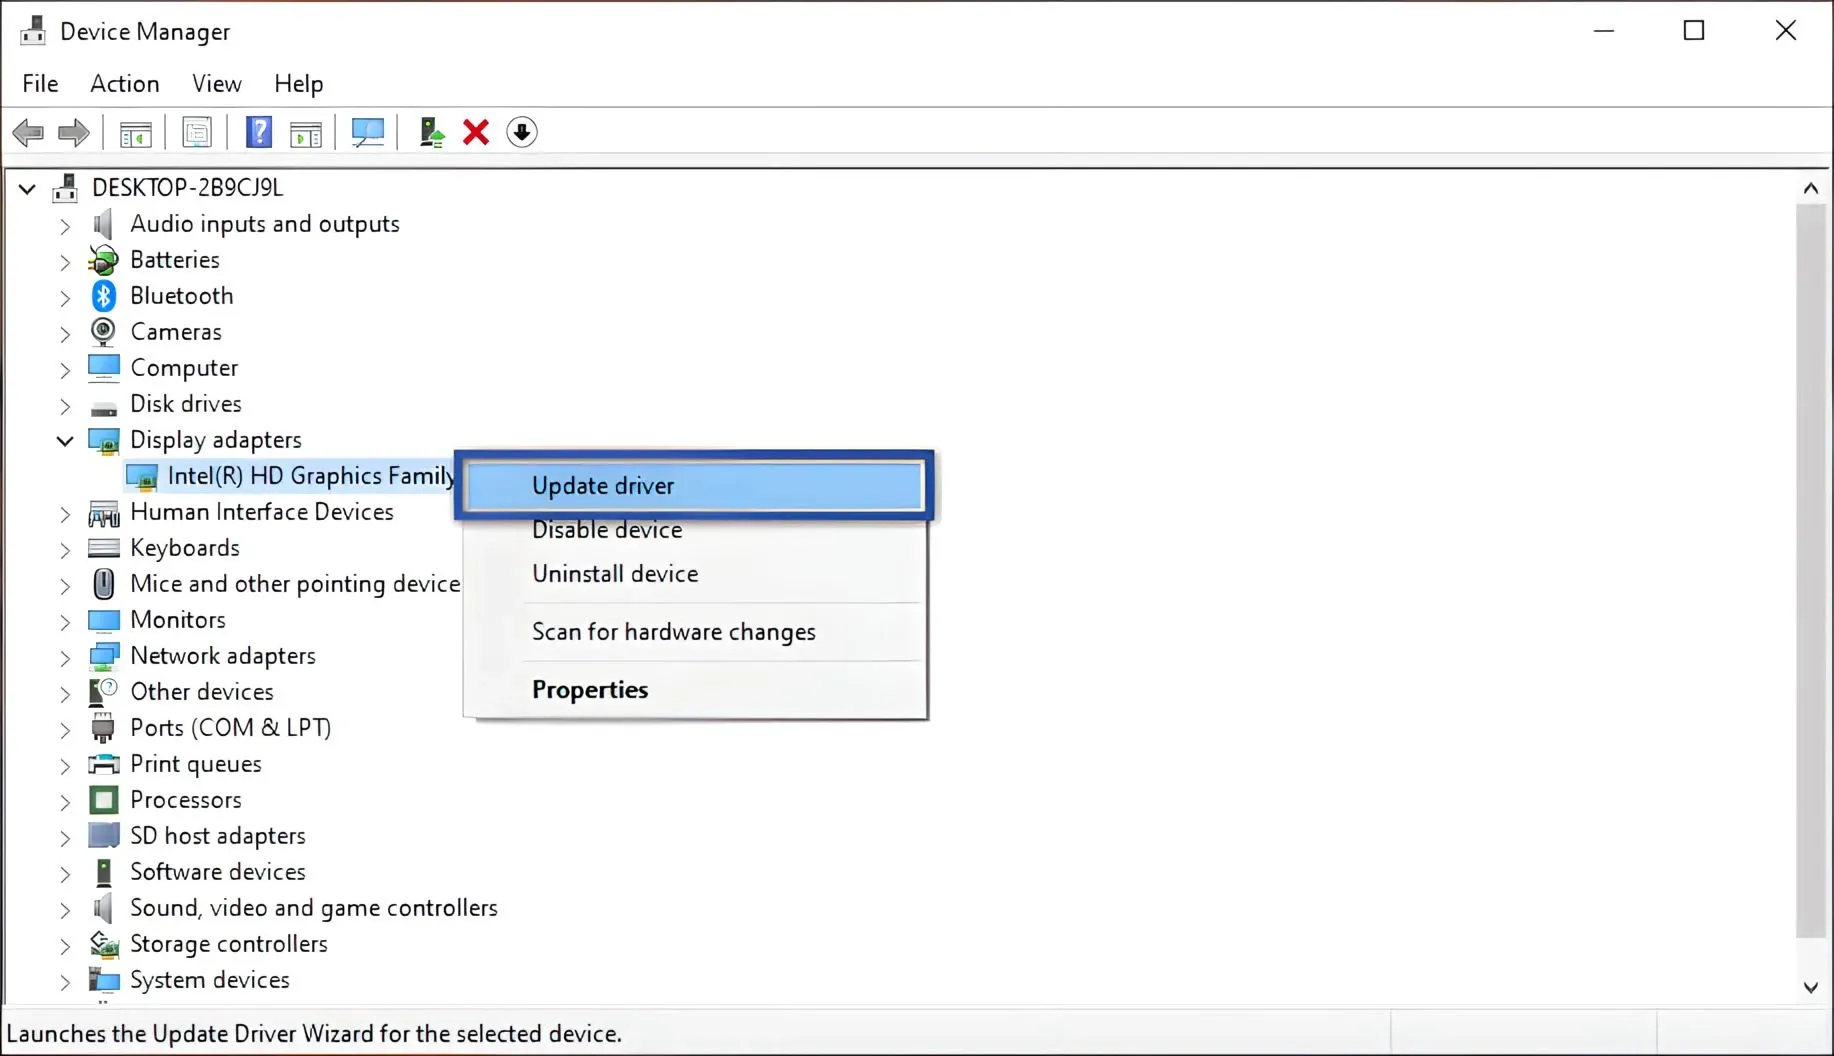
As I explained above, problematic drivers can also cause various issues in the system, including Windows 10 becoming slow or frequently freezing. Therefore, to ensure your drivers are not problematic, please follow these steps to check the Device Manager and update drivers if necessary.
- First, right-click on the Windows Start menu » select Device Manager.
- Then click on the problematic driver » then right-click on the driver that needs to be updated.
- Once done, select Search automatically for drivers.
- Next, your laptop will perform a search and driver installation process » once finished, please click Close.
- After that, try restarting your laptop and observe the changes.
- Done.
Note: If your driver is problematic, it's usually indicated by a yellow icon on the driver.
See Also: 9 Ways to Fix Windows Defender Cannot Be Turned Off
7. Run SFC & DISM
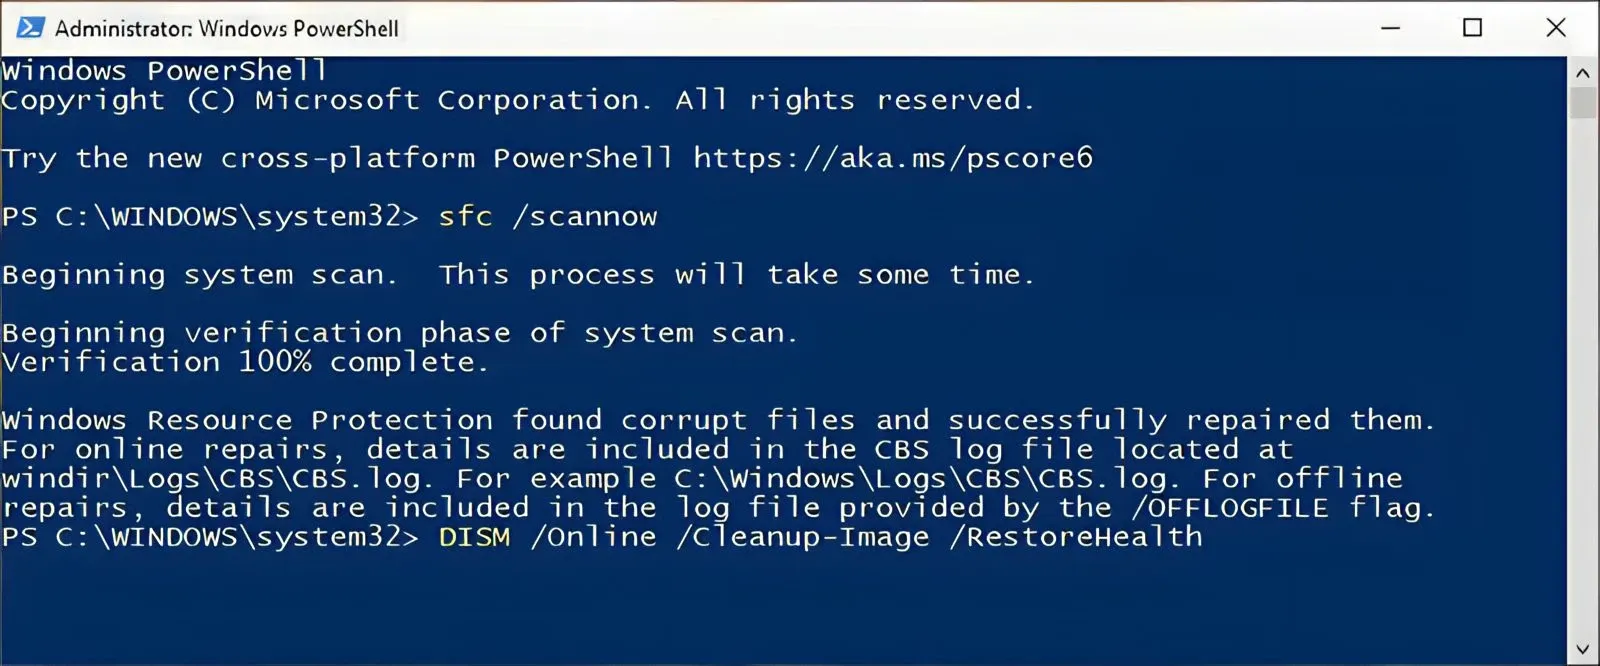
sfc /scannow

DISM /Online /Cleanup-Image /RestoreHealth
Next, you can also try running the SFC and DISM commands using Windows PowerShell. Why have I included this method in the review? Because there is a possibility that if this issue is caused by a corrupt or missing file system. In this case, one of the ways to fix it is by using the SFC and DISM commands.
- First, press the Windows + X buttons on your keyboard.
- Select Windows PowerShell Admin » click Yes to confirm.
- Next, type the command sfc /scannow » press Enter.
- Wait for a while for the scanning and repairing process.
- Once done, run the command DISM /Online /Cleanup-Image /RestoreHealth » press Enter.
- Wait for the process again.
- Afterwards, restart the device to see the results.
- Done.
Note: The duration of this process depends on the specifications of your computer / laptop device. Additionally, you can also apply these commands in the Windows Command Prompt.
8. Checking & Repairing Errors on Hard Disk
The hard disk is one of the most crucial components in a computer/laptop. When the hard disk encounters errors, it's no surprise that it leads to several issues afterward. Therefore, regularly checking the health of the hard disk can enhance system performance, making data or information processing faster. There are two methods you can employ to rectify errors on the hard disk: defragmenting the hard disk and running CHKDSK.
Defragmenting the Hard Disk
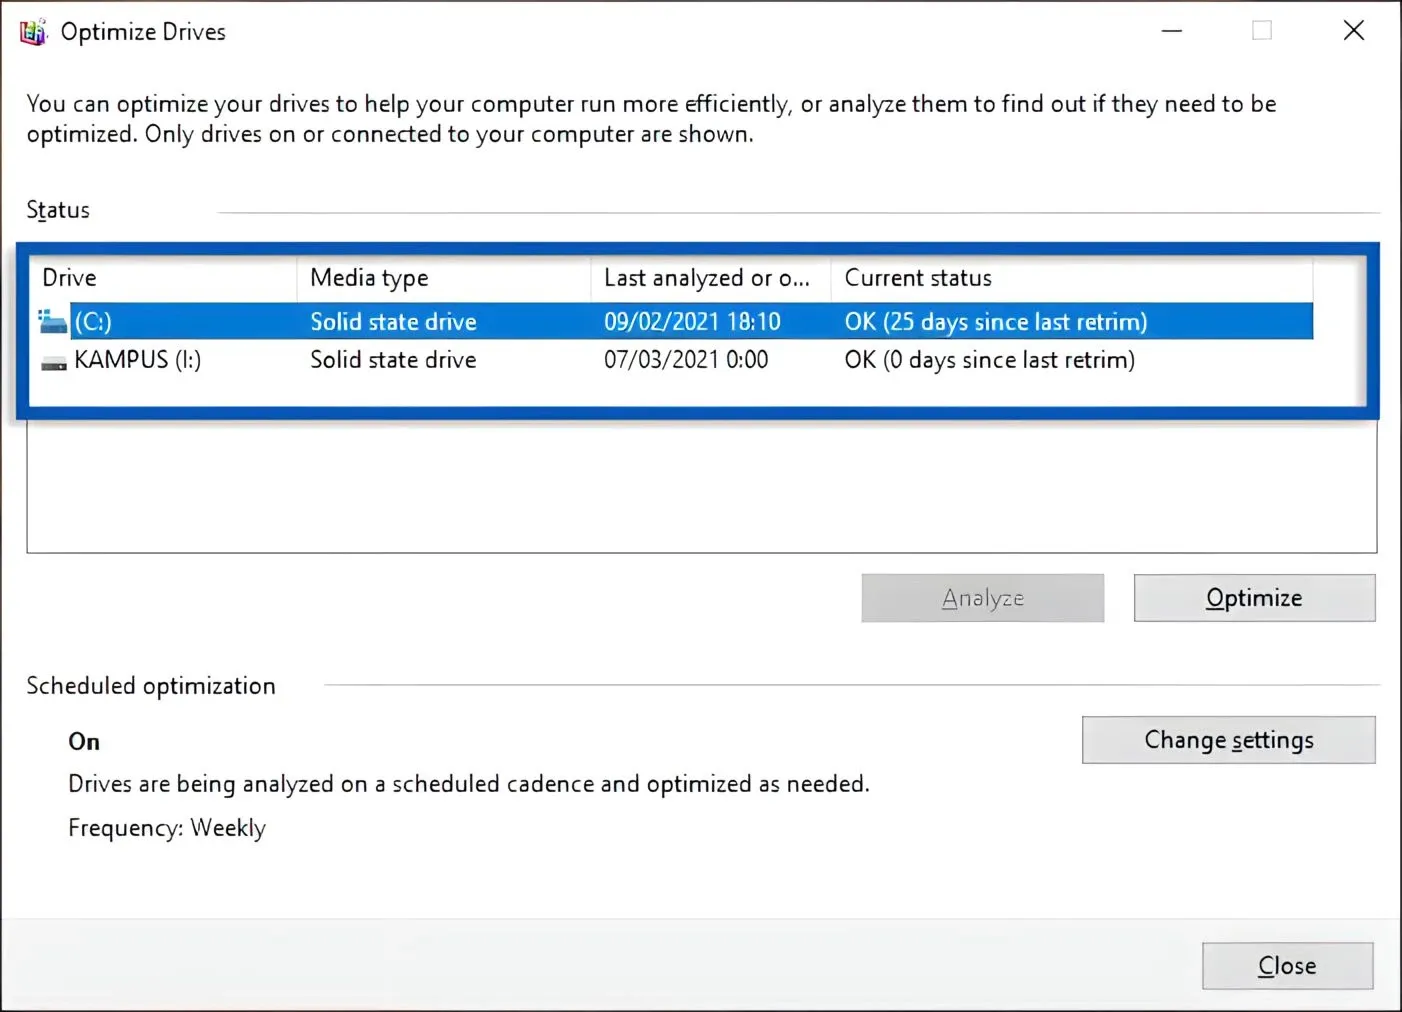
- First, click on the Start menu » Windows Administrative Tools » Defragment And Optimize Drives.
- Select the Local Disk (Drive) you wish to Optimize.
- Click Optimize to begin the optimization process and wait for it to complete.
- After optimization, you can restart your laptop/computer.
- Done.
Running the CHKDSK Command

chkdsk d: /r /f
- First, type "Command" in the Windows 10 search bar » then right-click on the Command Prompt from the search results » choose Run as administrator » click Yes to confirm.
- In the CMD window, type
CHKDSK d: /r /f» press Enter.
- Wait for the process to complete for a few moments.
- Afterward, please restart to observe the changes.
- Done.
Note: The term "d:" represents the labeling of the Local disk partition (you can use another disk you want to check). If you want to understand the functions of the above commands, you can find their explanations below.
/r Detects bad sectors and attempts to recover any readable information from them
/f Fixes any errors found on the disk
Also See: 10 Ways to Solve Thumbnail Image Not Showing in Windows
9. Hardware Upgrade
The reason why Windows 10 becomes slow is not only due to system errors alone. However, inadequate hardware specifications can also be a primary cause of this issue. Considering running the Windows 10 operating system, Microsoft has important System requirements that need to be taken into account. In this case, it hasn't even included the minimum specifications used to run a program.
Given this statement, there are several tips you can do to accelerate the performance of your Windows 10 so that it won't be slow anymore. One of them is by upgrading hardware, especially in terms of memory and storage. By increasing the RAM to 8GB and replacing the HDD storage with SSD, your Windows 10 will work optimally and have faster responsiveness.
10. Run Windows Update
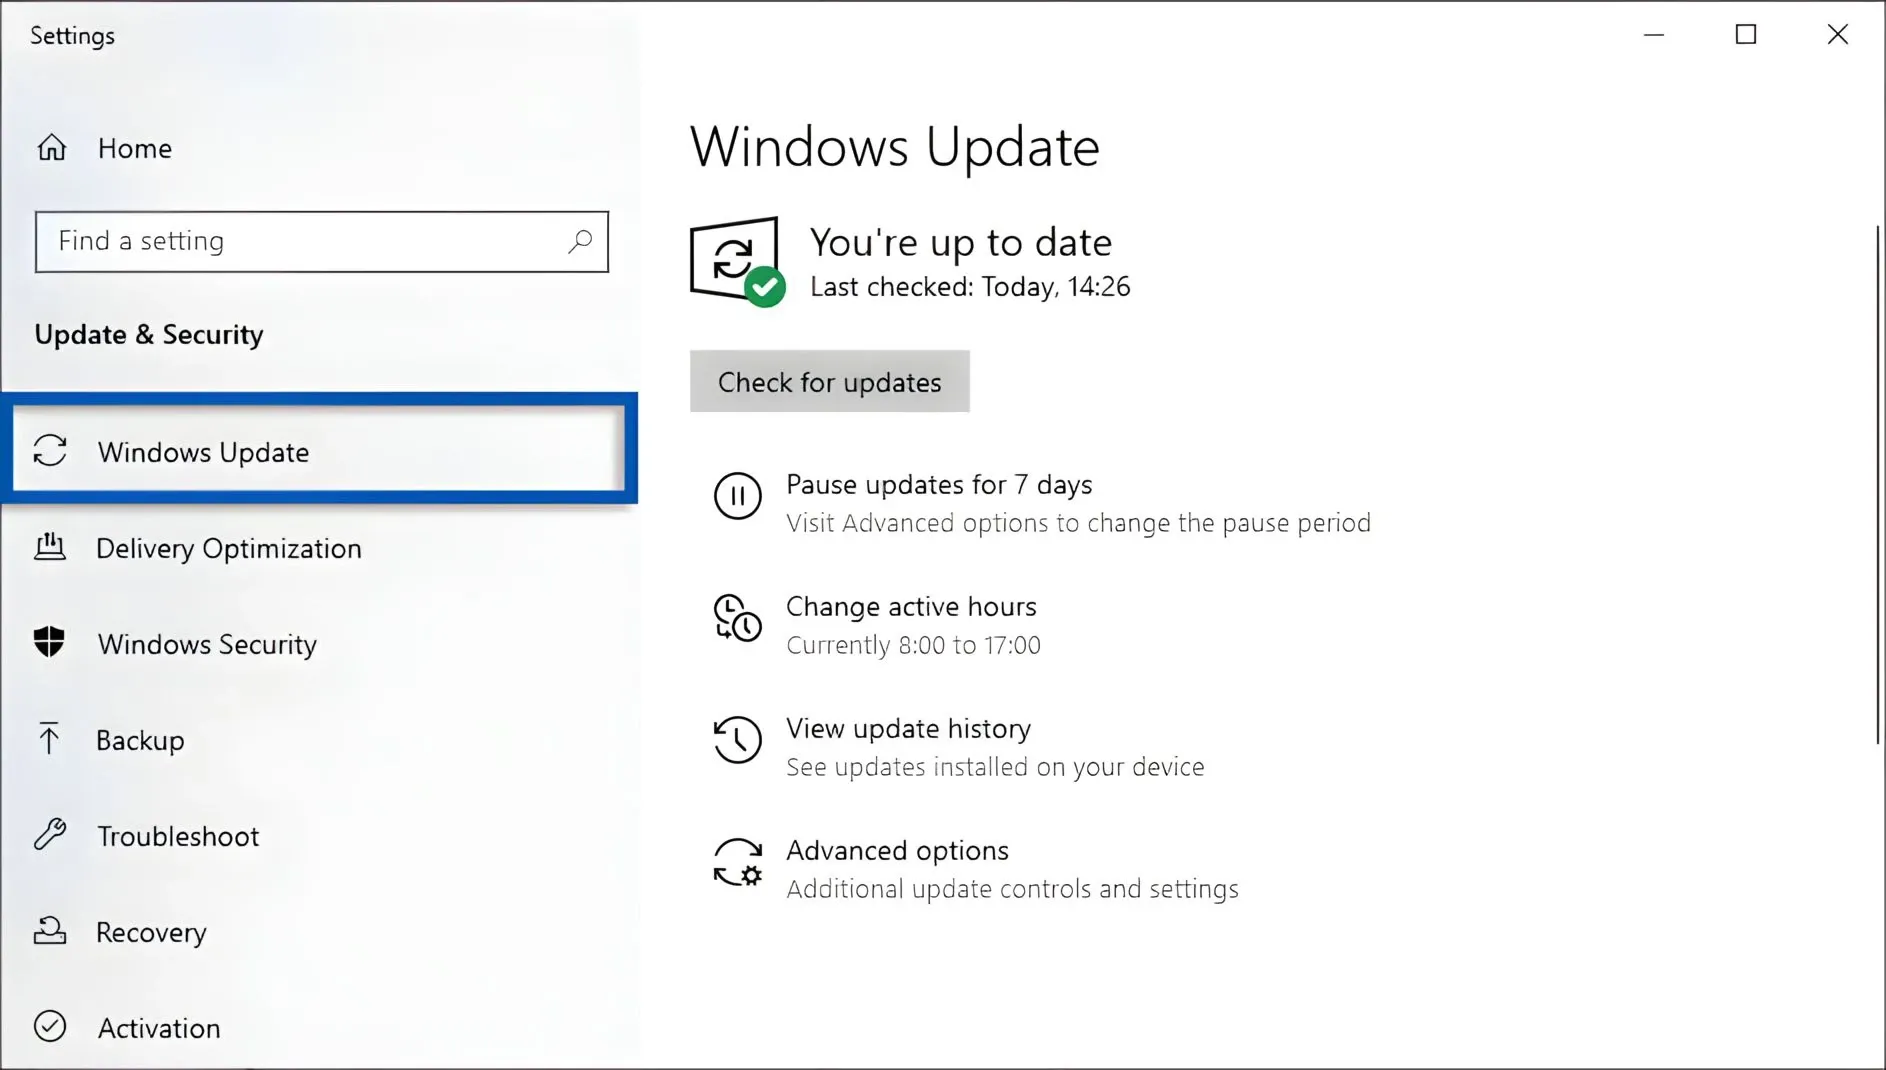
Next, you can perform Windows Update on your computer/laptop. This is done so that you can get the latest features, bug fixes from the previous version, and improvements in performance, stability, and security. Here are the steps to check the availability of Windows updates on your device:
- First, click on the Start menu, then go to Settings, Update & Security, and Windows Update.
- Click on Check for updates to see the availability of the latest Windows version.
- If available, please proceed with the update until it's complete.
- Done.
11. Scanning Using Antivirus
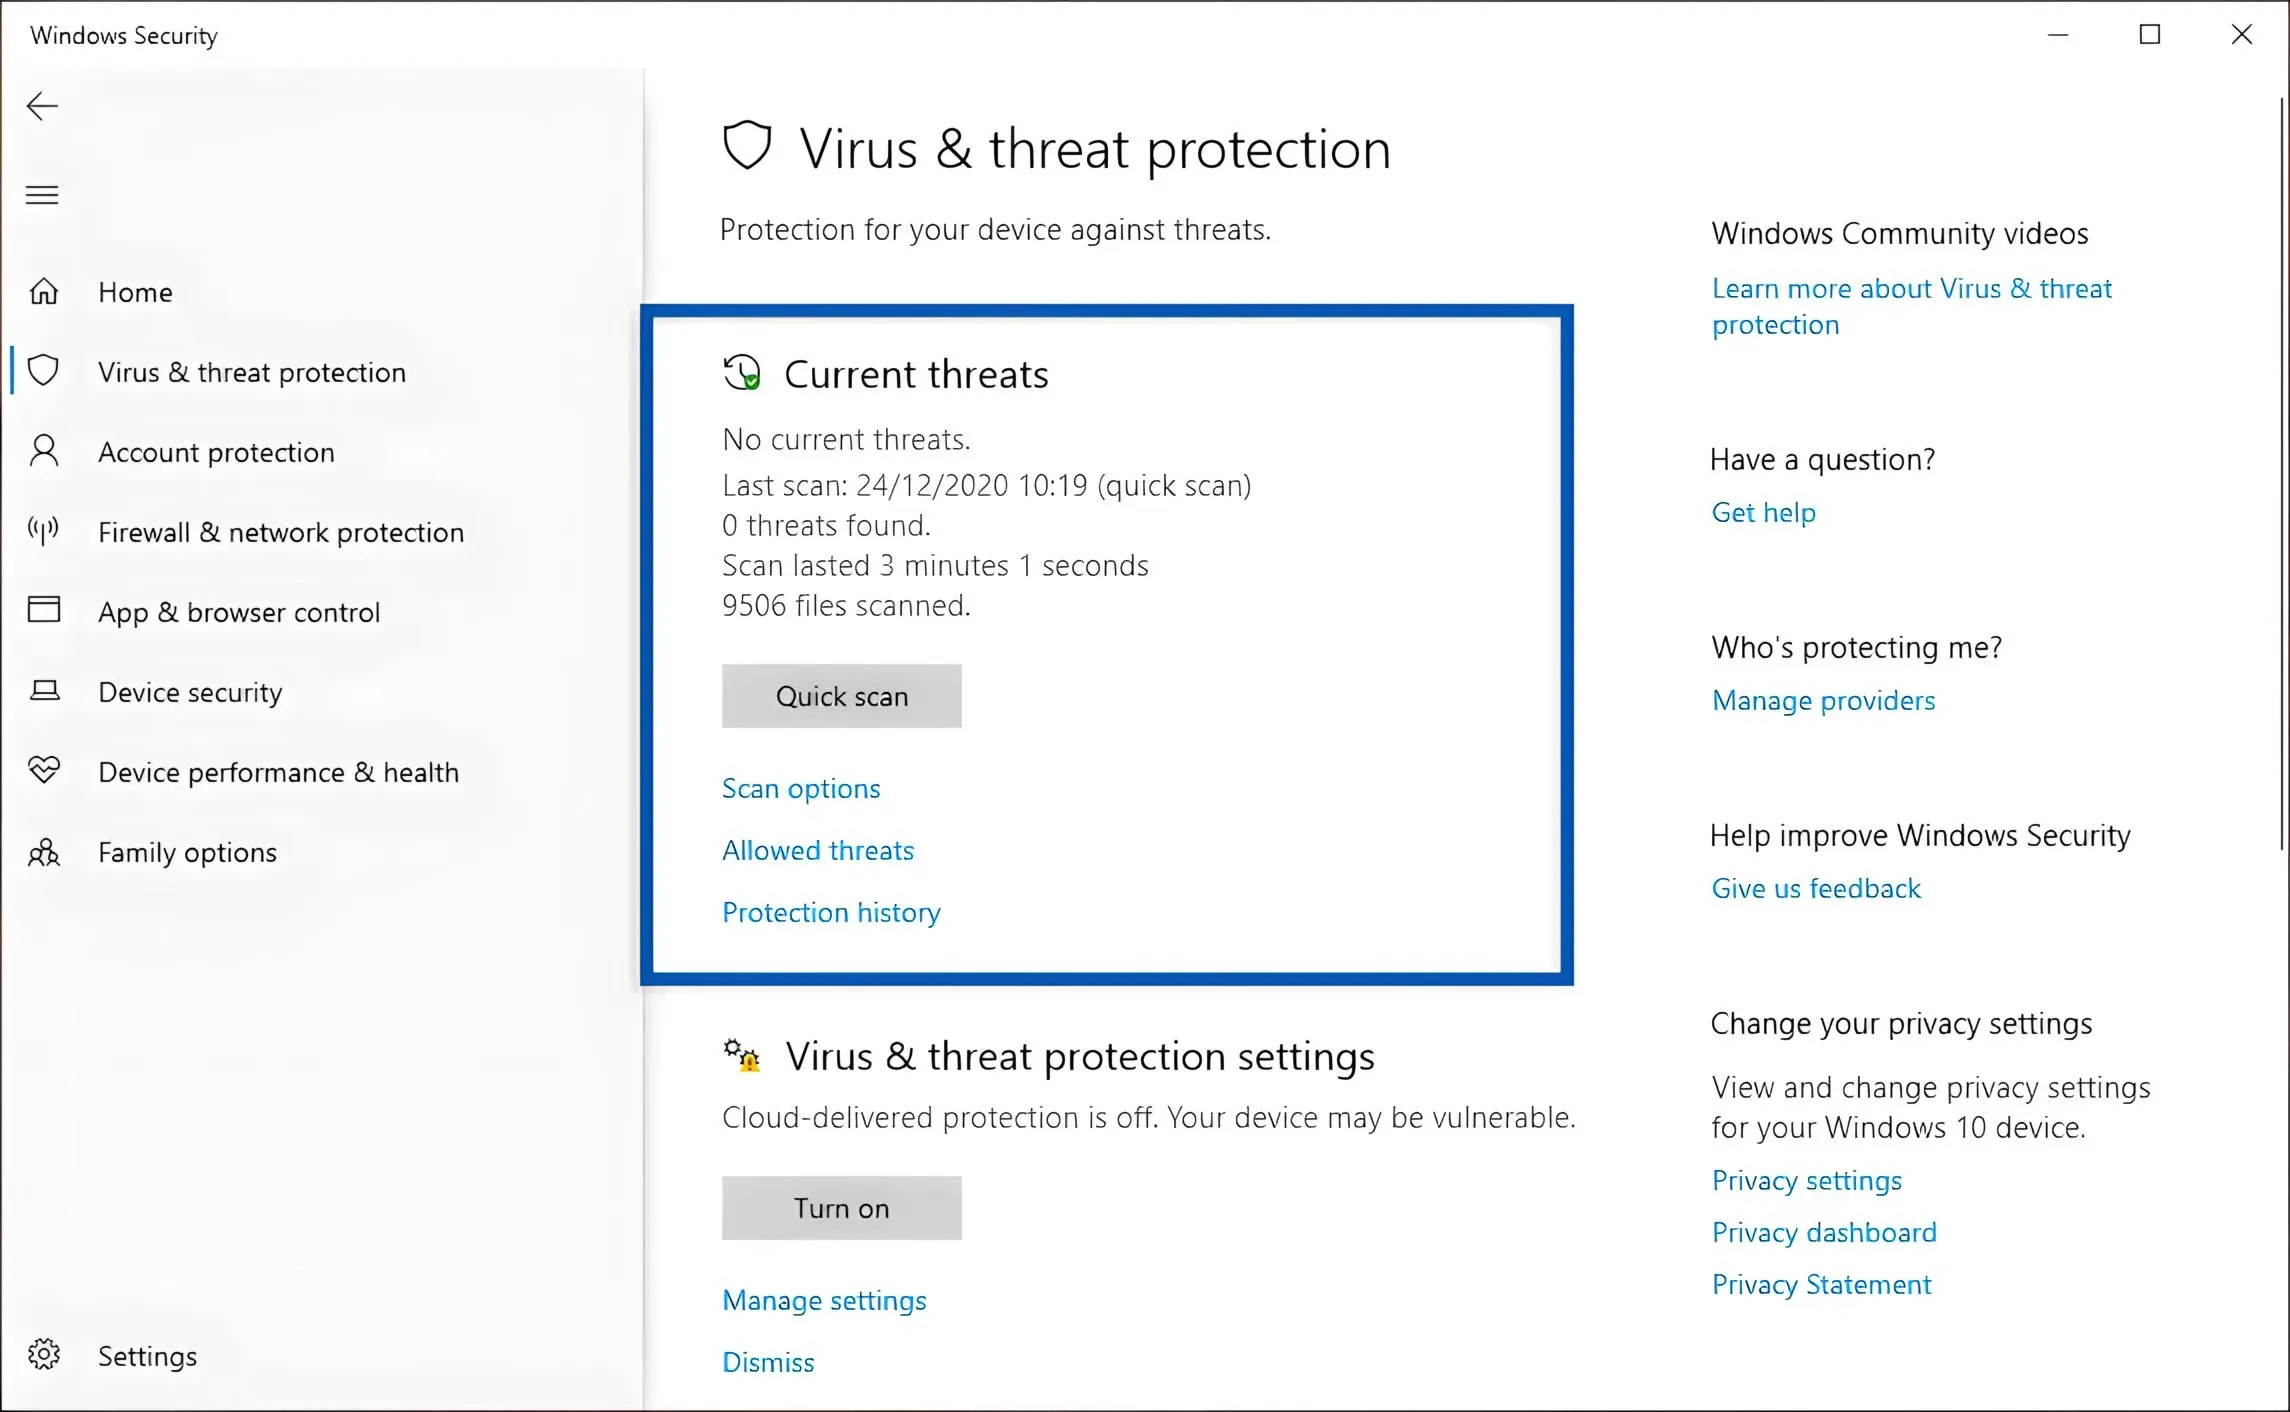
For the last method, perform a scan with an antivirus. The issue you are experiencing might be caused by viruses or malware that you are unaware of. To ensure this, you can use an antivirus application to perform a thorough scan on the system and installed applications.
- First, open the menu "Settings" » "Update & Security" » "Windows Security."
- Then, click on "Open Windows Security" » "Virus & threat protection."
- Click "Quick Scan" to initiate the scanning process.
- Wait until the scanning process is completed.
- Finished.
Apart from using the built-in Windows application, you can also perform scans with other antivirus applications. Currently, there are numerous antivirus applications that can clean viruses more effectively than built-in antivirus software.
See Also: 12 Ways to Solve "Can't Connect to this Network" WiFi Issue on Windows
How to overcome slow Windows 10 during booting
The slowness of Windows 10 is not only noticeable when you use it for specific purposes. However, even during the booting process, you'll experience the same issue, such as freezing or sudden screen freeze. Therefore, it is necessary to perform some configurations to speed up the ongoing booting process when the device is turned on. Here are several methods that you need to select and apply!
1. Reduce running startup programs
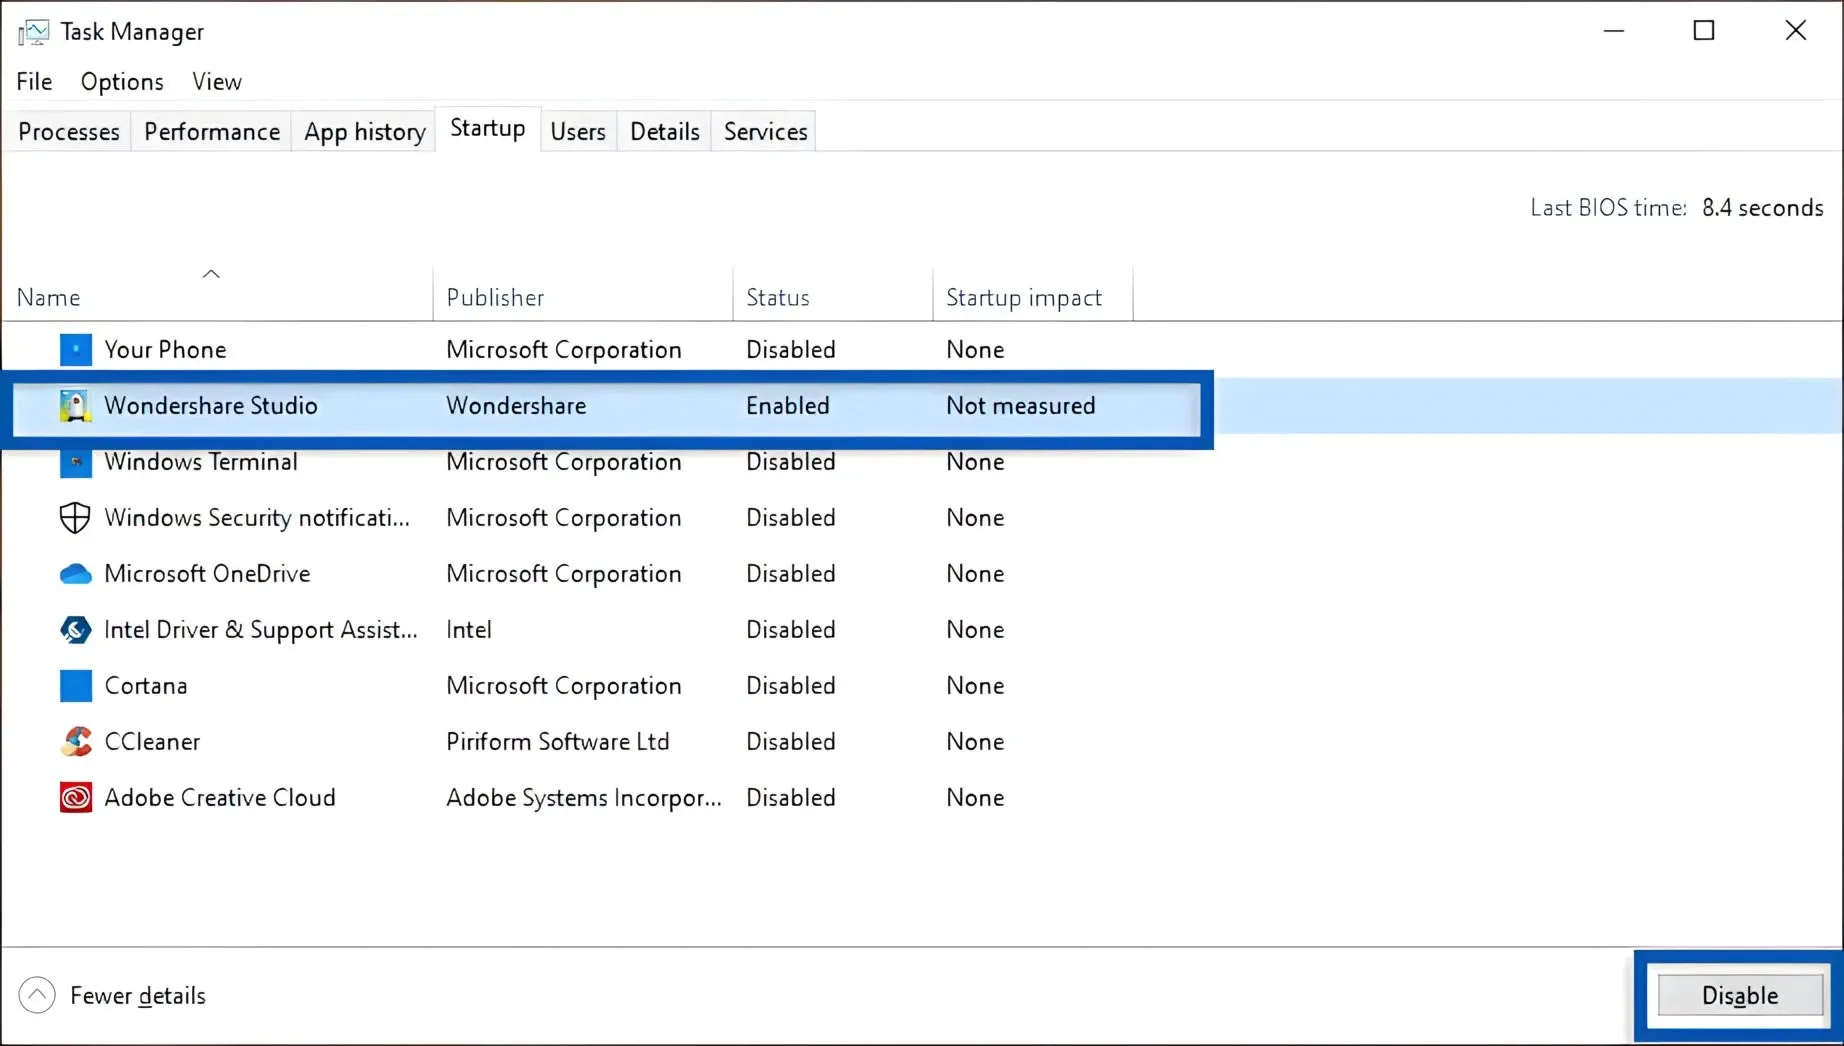
- First, right-click on the Windows Taskbar » select Task Manager.
- Then, click on the Startup tab » choose the program you want to disable.
- Once chosen, click Disable to deactivate it.
- Done.
There are many ways to disable startup programs on Windows. In other words, you don't have to be limited to the method I provided above. Simply use the easiest and most practical approach for you.
See Also: 7 Ways to Resolve Windows Explorer Opening Automatically During Windows Startup
2. Changing Boot Menu Timeout Settings
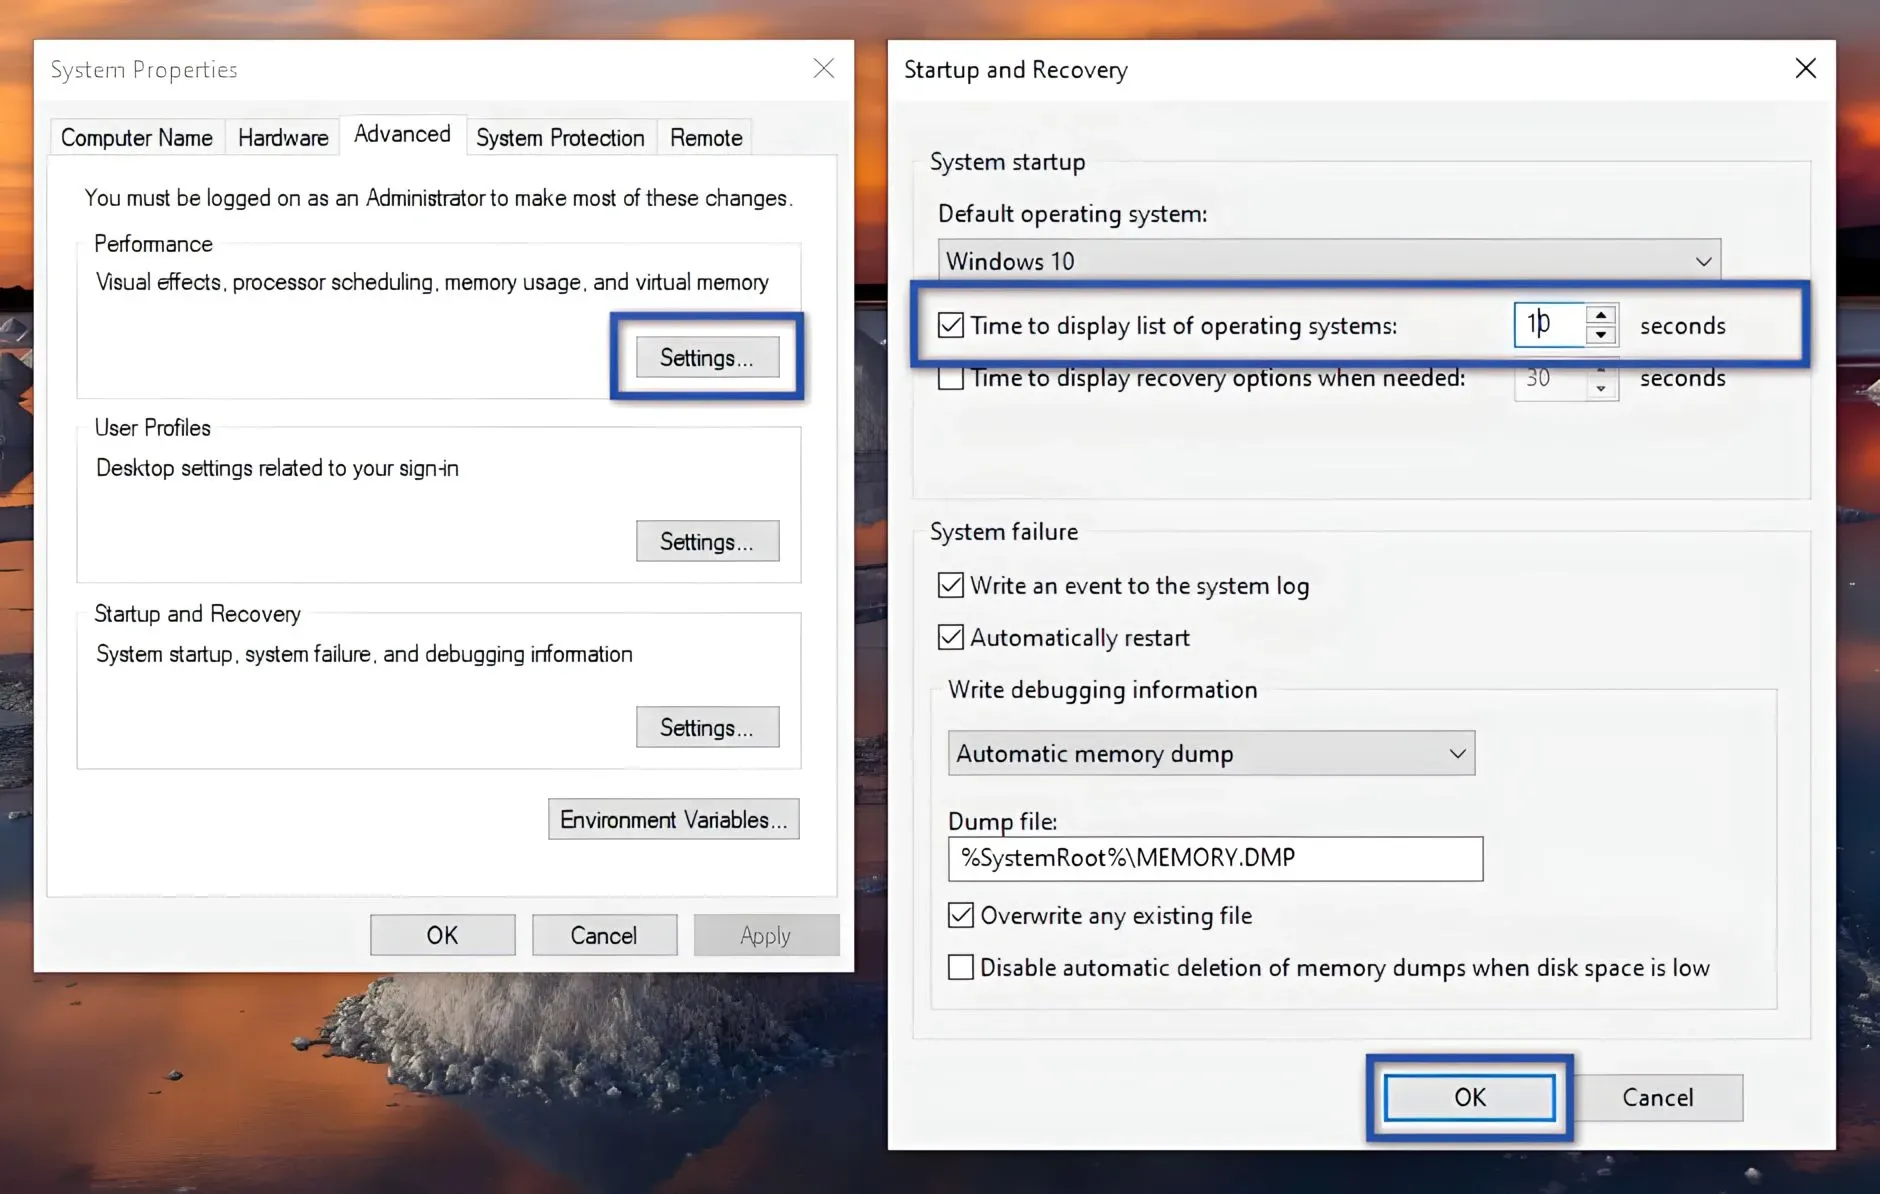
- To begin, click the Start menu on your Windows 10.
- Next, type "advanced system" in Windows Search and click on "View advanced system settings" from the search results.
- In the Advanced tab, navigate to the "Startup and Recovery" section and click on "Settings."
- Then, adjust the duration under the option "Time to display list of operating systems" to "10 seconds" and click "OK."
- Afterwards, restart your computer/laptop to see the results.
- Done.
3. Removing Unused Additional Fonts
Installing various types of fonts can be quite necessary at times. Especially if you are a graphic designer, where you will need numerous font styles for reference. However, on the other hand, having too many fonts installed on the system indirectly slows down the booting process on Windows. Considering that when you start up your device, Windows loads all the fonts at that moment.
See Also: 10 Ways to Solve Laptop WiFi Connection Issues on Windows 10, 8, 7
How to overcome Windows 10 slowness while browsing
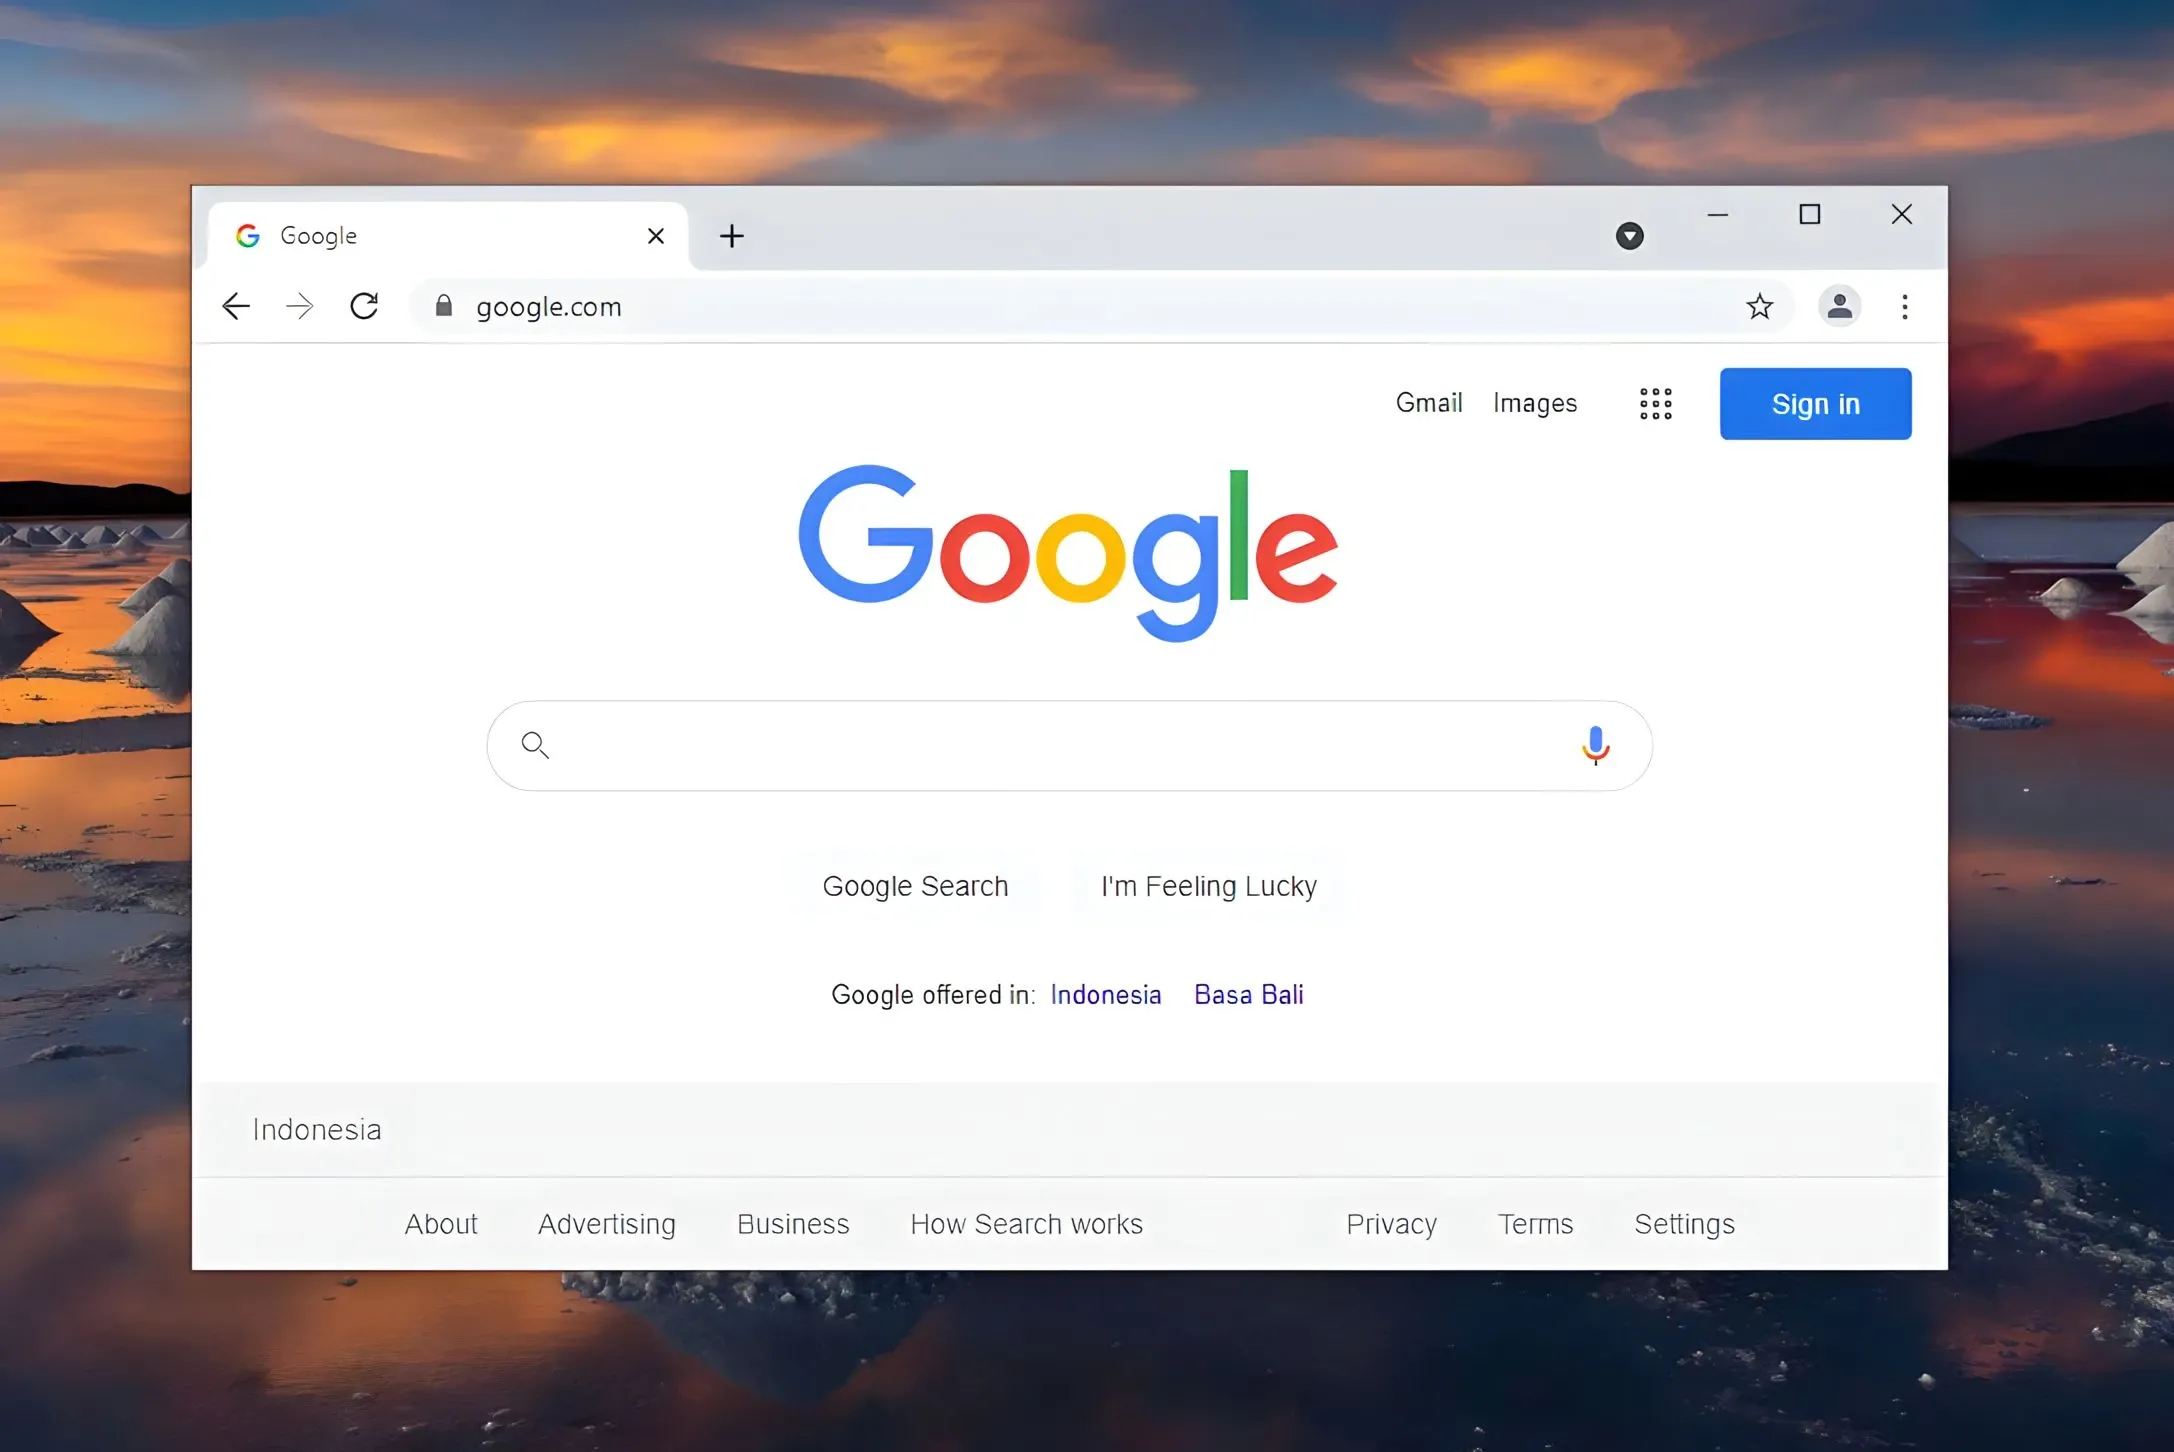
Furthermore, many Windows 10 users often experience freezing or sluggishness while multitasking with browsing. Some web browsers consume excessive RAM or CPU usage. Not to mention if you have installed too many Add-ons and opened an excessive number of browser tabs.
1. Use a stable internet connection
The first thing you need to ensure before browsing the internet is to check your internet connection, whether the network connection is having issues or not. This is because the slow/freezing browser might be caused by a problematic internet connection. In addition, having a stable and smooth internet connection can make users feel comfortable while accessing websites.
2. Clear history and cache
Moreover, history and cache can diminish browser performance. As more files accumulate, they can fill up your storage space and hinder ongoing processes. At least clear your browsing history, cache, and cookies once a week or once a month. This is done to keep your browsing experience stable and optimal.
3. Reduce Browser Extensions
Add-ons are third-party browser applications that serve to enhance user effectiveness. Each add-on has various functions that correspond to its purpose. If you install too many add-ons in your browser, your laptop's performance will become suboptimal or sluggish. Hence, it is essential to uninstall unnecessary add-ons. As a computer user, you should be wiser in adding add-ons to your browser applications.
4. Avoid Opening Multiple Tabs in the Browser
It's not just Add-ons. When you browse by opening multiple tabs, it can fill up the RAM and slow down your laptop. This is undeniable, considering that each tab you open consumes high memory and CPU resources. Thus, it's not surprising if your laptop experiences slowness or even hangs.
See Also: 9 Ways to Resolve Unopenable Folders in Windows
Closing
From all the explanations and tips above, it can be concluded that; to achieve a stable and non-slowing Windows 10 performance, you must perform maintenance both in terms of software and hardware. On the software side, you can start by cleaning cache files, uninstalling installed applications, updating the system and applications, as well as fixing errors in problematic drivers or applications. Meanwhile, on the hardware side, you need to clean the inside parts that are dirty or dusty. If necessary, upgrade the RAM and storage capacity (from HDD to SSD).
Those are some of the causes and tips that you can follow to improve the sluggish or slow performance of Windows 10. Share this article on your social media for it to be more useful and beneficial. If there's something you need to ask or convey, write it through the comment section below. Thank you and good luck!
What causes a laptop to be slow or freeze when used?
This could be due to low device specifications, viruses, full storage space, or viruses.
What causes applications to frequently experience "not responding"?
The issue of applications not responding often occurs due to excessive multitasking.
Does installing many applications make Windows 10 slow?
Certainly, installing many applications can make your Windows 10 slow. It's better to install applications that you actually need and remove applications that you don't need.


